Blind Receiving is similar to normal Receiving, except that the Materials being Received were not necessarily expected.
Overview
Receiving is the process in which you confirm a specific Shipment's contents, assign that Inventory to License Plates, and enter them into your system.
The Blind Receiving section is where you can Receive unexpected items.
From here you can...
Receiving Strategy
The first Blind Receiving screen allows you to select how you'd like to Receive the Materials, whether by Shipment or Owner and Project.
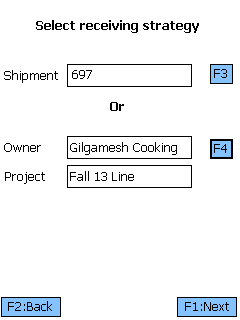
Tapping or pressing F3 takes you to a screen from which you can select an existing Shipment or create a new one directly from the Mobile Device.
Tapping or pressing F4 takes you to a screen from which you can specify an Owner and a Project to associate with the Materials being Received.
Tapping F1: Next or pressing the F1 key takes you to the Receive Tasks screen for the selected Shipment.
Tapping F2: Back or pressing the F2 key takes you back to the main menu.
If you chose to create a new Shipment to Receive by, tapping F8: New or pressing the F8 key open the New Shipment screen.
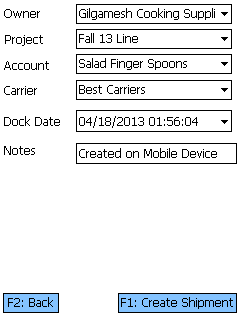
Tapping F1: Create Shipment or pressing the F1 key creates a new Shipment with the specified details.
Tapping F2: Back or pressing the F2 key takes you back to the previous screen.
| Owner: | The Owner you are creating a Shipment for. |
| Project: | The Project under which the Shipment is classified. |
| Account: | An Account to associate with the Shipment. |
| Carrier: | The Carrier delivering the Shipment. |
| Dock Date: | The date and time the Shipment is due. |
| Notes: | An open field for Notes about the Shipment. |
*Those in red are required fields.
Receive
The Receive screen is where you enter all the information about the Materials you are Receiving.
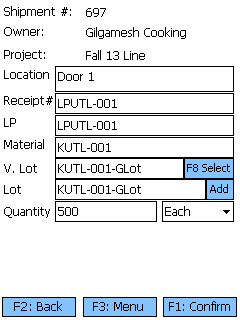
Tapping F1: Confirm or pressing the F1 key Receives the Materials, adding the new Inventory to the system.
Tapping F3: Menu or pressing the F3 key opens a menu with the following additional options:
- F4: Confirm & Putaway will confirm the current entered information and immediately open the Putaway screen.
- F6: Capture Temp opens the Temperature Capture screen.
- F8: Select allows you to select a Lot/Vendor Lot from a list of existing Lots for the Material.
- F11: Inquiry opens the Inquiry menu screen.
- Create Lot allows you to create a new Lot.
- Close Shipment closes the Shipment from which you are Receiving.
- F9: Toggle Volume/Weight toggles the weight or volume entry for catch weight Materials.
Tapping F2: Back or pressing the F2 key takes you back to the Receive Strategy screen.
| Location: | The Dock Door Location at which the Materials are being Received. |
| Receipt #: | The number identifying this particular receipt. |
| LP: | The License Plate onto which the Materials are being Received. You can enter an existing License Plate, or create a new one. |
| Mat: | The Material's LookUp Code. |
| V. Lot: | The Vendor Lot for the Material. Tapping F8 Select or pressing the F8 key allows you to select from a list of Vendor Lots. |
| Lot: | The Lot for the Material. Tapping the Add button takes you to the Create Lot screen where you can create a new Lot and Vendor Lot, as outlined below. |
| Quantity: | The number of Packages of the Material being Received. |
| UOM: | A drop-down list from which you can select the Packaging Type of the Material Received. |
| Net: | The Net Weight of the Materials being Received, without its Packaging. This box should be filled out when Receiving a variable weight Material. |
| Tare: | The Weight of the Materials' Packaging. |
| Gross: | The Gross Weight of the Materials being Received, including their Packaging. This box should be filled out when Receiving a variable weight Material. The weight Unit of Measurement is displayed to the right of the Gross Weight field. |
*Those in red are required fields.
Opening the Capture Temp. screen allows you to record temperature readings for the operation, and tie them to the Shipment or License Plate.
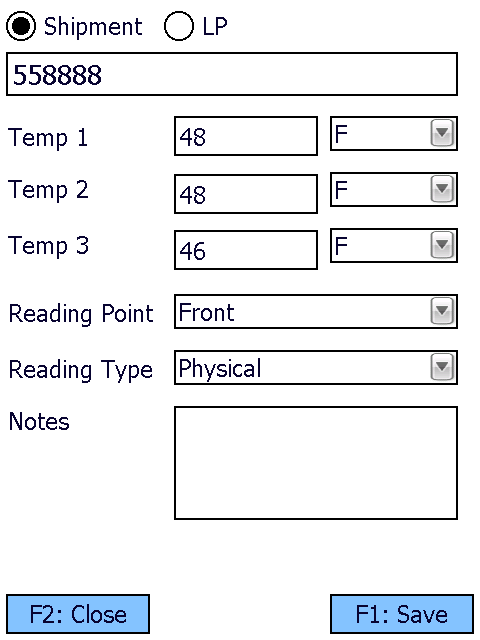
Selecting Shipment or LP determines whether the Temperature Capture information will be associated with the Shipment or the License Plate in question. The field below this choice will be automatically populate from the previous screen, but can be overwritten to assign the capture to whichever Shipment or License Plate you'd like.
You can enter up to three Temperature Readings, and select whether the temperature was recorded in Fahrenheit or Celsius.
The Reading Point and Reading Type can also be chosen for the reading, further specifying information by selecting from various customizable options configured on the Desktop.
Additional Notes can be recorded for the reading.
Tapping F1: Save or pressing the F1 key saves the temperatures entered for the chosen Shipment or License Plate. Additional Temperature Readings can be recorded.
Tapping F2: Close or pressing the F2 key closes the Temperature Capture screen, returning you to the previous screen. Any unsaved changes are discarded.
Tapping the Add button next to the Lot field, or pressing the F7 key allows you to create a new Lot and Vendor Lot for the Material.
Tapping F1: Save or pressing the F1 key saves the changes you've made here, creating a new Lot (and Vendor Lot if desired).
Tapping F2: Cancel or pressing the F2 key discards all changes you've made here.
| Owner: | Displays the Owner for the Material. |
| Project: | Displays the Project under which the Material is classified. |
| Material: | Displays the LookUp Code of the Material. |
| Vendor Lot: | Tapping the "New" box to place a check mark in it allows you to create a new Vendor Lot, whose LookUp Code can be entered in the Vendor Lot field. Leaving this field blank allows the system to create a LookUp Code for you. |
| Manufacturing Date: | The date on which the Vendor Lot was Manufactured. |
| Expiration Date: | The date on which the Vendor Lot Expires. |
| VAT: | The Vat in which the Materials were created, if applicable. |
| Notes: | An open field for Notes about the Lot. |
| Lot #: | The Lot LookUp Code. Leaving this field blank allows the system to create a LookUp Code for you. |
Serial Information
If the Materials you are Receiving are Serialized, or have Variable Weight or Dimensions, you will be brought the Serial Information screen once you Confirm Receiving.
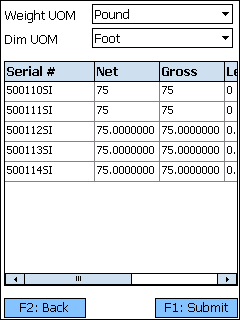
You can select the Weight Unit of Measurement and the Dimension Unit of Measurement from the drop-down lists at the top of the screen.
Tapping F1: Submit or pressing the F1 key saves the Materials with their Serial information.
Tapping F2: Back or pressing the F2 key takes you back to the previous screen.
| Serial #: | A unique Serial Number to identify the item. |
| Net: | The Net Weight of the item, without its Packaging. This box should be filled out for variable weight Materials. |
| Gross: | The Gross Weight of the item, including their Packaging. This box should be filled out for variable weight Materials. |
| Length: | The Length of the item. This box should be filled out for variable dimension Materials. |
| Height: | The Height of the item. This box should be filled out for variable dimension Materials. |
| Width: | The Width of the item. This box should be filled out for variable dimension Materials. |
| Last Updated: |
| 06/06/2025 |
Related Concepts
Copyright © 2025 Datex Corporation