Sections
Barcode Receiving is similar to normal Receiving in that you verify what Materials have been Shipped to your Warehouse, but it is done strictly by scanning Barcodes.
Overview
Receiving is the process in which you confirm a specific Shipment's contents, assign that Inventory to License Plates, and enter them into your system. The Receiving section is where you will search for Receiving Tasks and execute them, confirming details about the Tasks such as Quantity and Lots.
Before you are able to Receive by Barcode, you will need to have set up Barcode Definitions.
From here you can...
Shipment Search
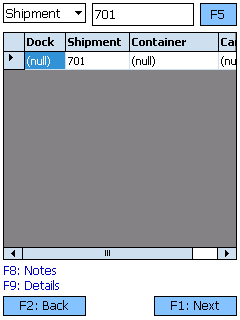
This screen allows you to search for open Inbound Shipments.
The drop-down box allows you to search for Inbound Shipments by Shipment, Order, or Dock Door.
The field next to the drop-down list is where you enter the Shipment ID, Order LookUp Code, or the Dock Door name.
Tapping F5 or pressing the F5 key loads all Shipments matching the information provided.
Tapping F1: Next or pressing the F1 key takes you to the Barcode Receiving for the selected Shipment.
Tapping F2: Back or pressing the F2 key takes you back to the main menu.
| Dock: | The Dock Door at which the Shipment is scheduled to arrive. |
| Shipment: | The Shipment ID. |
| Container: | The LookUp Code for the Load Container, if any. |
| Carrier: | The Carrier delivering this Shipment. |
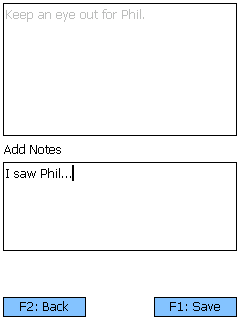
Pressing the F8 key allows you to view and add Notes for the selected item.
Pressing the F9 key allows you to view and edit details about the Shipment.
Tapping F1: Save or pressing the F1 key saves the changes you've made here.
Tapping F2: Cancel or pressing the F2 key discards all changes you've made here.
| BOL: | The Bill of Lading Number for the Shipment. |
| Seal ID: | The Seal ID number for the Shipment. This field is not editable. |
| Container: | The Load Container for the Shipment. |
| Dock Date: | The scheduled Dock Appointment Date for the Shipment. |
| Current Notes: | Displays all the Notes in the system for the Shipment. |
| Add Note: | An open field in which you can add Notes to the Shipment. |
Barcode Receiving
This is where you actually Receive the Materials from the Shipment
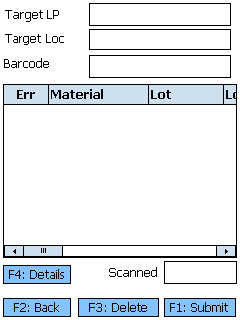
The Target LP and Target Location fields are for entering or scanning the License Plate and Location that the Materials will be Received to, respectively. All Material Barcodes scanned will be associated with that License Plate and Location.
Barcodes are scanned into the Barcode field.
The Scanned field indicates how many Barcodes have been scanned.
Tapping F3: Delete or pressing F3 will delete the selected Received Material.
Tapping F1: Submit or pressing the F1 key will save the Received Materials in the system.
Tapping F2: Back or pressing the F2 key takes you back to the Shipment Search screen.
The information about the Received Materials is derived from the Barcode Definitions. These will need to be set up separately to ensure the Materials are Received properly.
| Err: | Error messages are displayed here. |
| Material: | A system-generated field displaying the Material's LookUp Code. |
| Lot: | The Lot for the Material. |
| Lot Description: | A description of the Lot. |
| V. Lot: | The Vendor Lot for the Material. |
| Manuf. Date: | The date on which the Vendor Lot was Manufactured. |
| Exp. Date: | The date on which the Vendor Lot Expires. |
| Net Weight: | The Net Weight of the item, without its Packaging. This box should be filled out when Receiving a variable weight Material. |
| Gross Weight: | The Gross Weight of the item, including their Packaging. This box should be filled out when Receiving a variable weight Material. |
| Barcode: | The scanned Barcode for the Material |
| Serial Number: | A unique Serial Number to identify the item. |
| Quantity: | The number of Packages of the Material being Received. |
Tapping F4: Details or pressing the F4 key opens a pop-up window displaying the following Details about the Material:
- The Material's Name
- A description of the Material
- The Packaging Type for the Material
- How many Pallets high the Material can be safely stacked
- How many Packages can be set on the first level of the stack
Tapping the OK button closes the pop-up.
| Last Updated: |
| 06/06/2025 |
Related Concepts


