Sections
Overview
Built on Windows Workflow Foundation, the Workflow Designer is where you can create, edit, enable, or disable Workflows in Footprint. Though the Workflows are fairly simple to understand, following a flowchart progression from beginning to end, they make use of light coding that can quickly become overwhelming without any programming experience. Because of this, the customization of Workflows is not recommended for the typical Footprint user. If you are interested in using customized Workflows, contact Datex Corporation before making any changes to help determine the best course of action.
About Workflows
Workflows can be used to customize Footprint's performance and functionality, automating all sorts of processes based on sets of information in the system. At its core, a Workflow takes input information, runs it through a series of statements, and returns an output according to the desired behavior. They can be used to trigger new events, change the way events occur, or to stop events from happening in the first place. Thanks to the many Activities available in the Toolbox, Footprint's Workflows offer near endless customizability to augment or supplant the system's out of the box functionality.
Workflow Reference Guides
Workflow Types - A listing of the different contexts through which you can run custom Workflows.
Workflow Data Primitives Dictionary - A guide to each component that can be leveraged by your Workflow.
Workflow Activities Dictionary - A break down of the custom Footprint functionality available through your Workflow.
Warning
The Active Workflow is live in the system, regardless of whether the Workflow functions as intended or not. Workflows are best designed and tested in a test environment, then Imported to the main system.
From here you can...
- Configure Workflows
Main Screen Layout
Underneath the toolbar, the Workflows section has been divided into six separate areas:
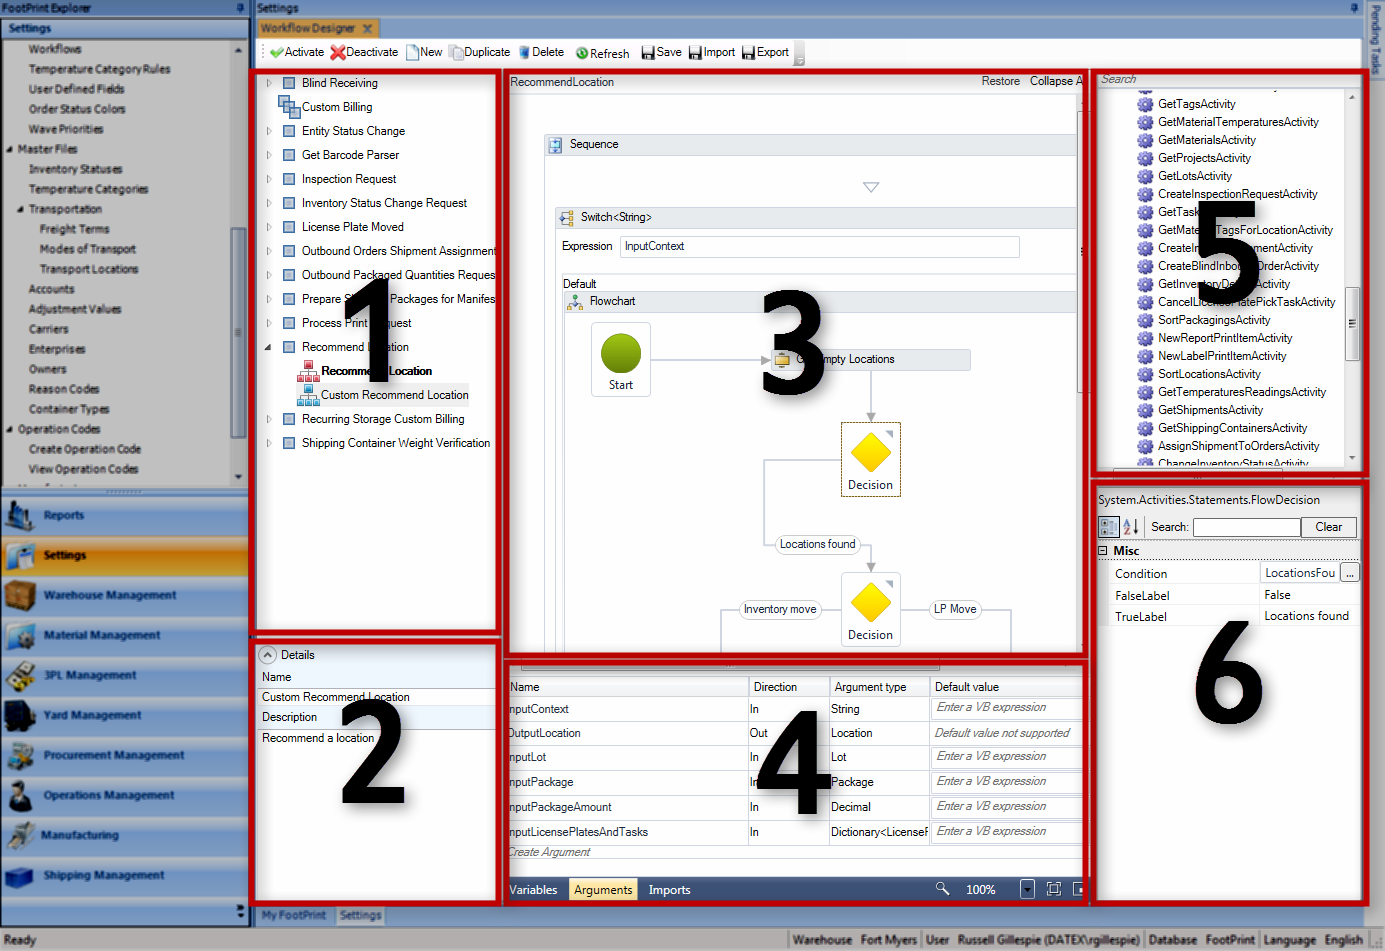
1. Workflow List
A list tree displaying the types of Workflows, which can be dropped-down to show each instance of the selected type in the system. Double-clicking a Workflow will open it in the Designer Canvas.
2. Workflow Details
Displays basic information about the selected Workflow.
3. Designer Canvas
This area will display the specifics of the open Workflow, and is where you can edit the Workflow.
4. Workflow Arguments
An editable list of each Argument involved in the open Workflow. Can also display the Workflow's Variables, and Imports.
5. Toolbox
A list tree containing all basic and Footprint-specific Activities available for use in the Workflows.
6. Activity Parameters
Displays the Parameters of the Activity selected in the Canvas. These Parameters can be edited.
Designer Toolbar

Along the top of the Workflow Designer is the Toolbar:
| Activate: | Activates the Workflow selected in the Workflow List. If only one Workflow can be Active for the selected Workflow type, this automatically Deactivates any other Workflow of the same type. The system will adhere to the Active Workflow for the corresponding behavior. |
| Deactivate: | Deactivates the Workflow selected in the Workflow List. This only functions for Workflows that can have multiple simultaneously Active instances. |
| New: | Creates a new blank Workflow of the type selected in the Workflow List. |
| Duplicate: | Creates a duplicate copy of the Workflow selected in the Workflow List. |
| Delete: | Deletes the Workflow selected in the Workflow List. |
| Refresh: | Allows you to Refresh either the Workflow Selected in the Workflow List, or all Workflows in the List. |
| Save: | Saves any changes made to the Workflow open in the Canvas. |
| Import: | Allows you to Import a Workflow to Footprint that was previously saved as a XML document. Footprint automatically detects the Workflow type that is Imported. |
| Export: | Allows you to save a copy of the open Workflow as a XML document. |
Workflow List
The Workflow List displays each different type of Workflow in Footprint. Each type has a folder, which can be dropped down to display each unique instance of the Workflow type. By double-clicking any of the Workflows, it will open in the Designer Canvas.
| The standard Workflow icon indicates this particular Workflow type can only have one Active instance at any given time. | |
| The multiple Workflow icon indicates that this Workflow type can have multiple Active instances at once. This currently only applies to the Custom Billing Workflow. | |
| Workflows in bold are currently Active. | |
The following is a short description of each available type of Workflow. For more information on each Workflow type, see the Workflow Types section.
| Blind Receiving: | The Blind Receiving Workflow is called when submitting a Blind Receipt on the Mobile Device. It is commonly used to create Orders or Shipments to correspond with the Receipt. |
| Custom Billing: | The Custom Billing Workflows allow for unique Billing situations. When Active, Workflows can be referenced by Contract Lines. Typically used for precise Billing methods that may not be covered by the standard Billing Strategies, leveraging the wealth of information available in the system. Multiple Custom Billing Workflows may be active at once. |
| Entity Status Change (Before Commit): | The Entity Status Change Workflow is called whenever ANY Entity in the system has its status changed, prior to committing that change - whenever Orders, Shipments, or Tasks of any sort are Created, Canceled, Processed, Completed, and so on. The Workflow can be used to perform a variety of actions when any specified Entity is changed to or from the specified Status; as a result, this Workflow is extremely versatile. Be warned, this is the most frequently called Workflow, and the more complex it becomes, the more it may drag on your system performance. |
| Get Barcode Parser: | Used during Blind Barcode Receiving on the Mobile Device, the Get Barcode Parser Workflow is called after scanning the first Barcode. It is used to indicate which Barcode Definition should be referenced for the first scanned Barcode, and then can be configured to allow for multiple, chained Barcode scanning, with each Barcode scanned referencing different Definitions to enter as much information for each Receipt as necessary. |
| Inspection Request: | The Inspection Request Workflow is called upon the creation of new Inventory in the Warehouse, whether through Receiving or Manufacturing. This Workflow is intended to create Inspection Tasks for the new Materials. |
| Inventory Status Change Request: | This Workflow is used to automatically change the Status of Inventory involved with certain activities (typically to a hold status), and is called in five distinct cases: the release of Inspection Tasks, the Confirmation of Inspection Tasks, the Confirmation of Receive Tasks, the Confirmation of License Plate Move Tasks, and the Confirmation of Inventory Move Tasks. Additionally, new cases can be added to call the Workflow as needed. |
| License Plate Moved: | This Workflow is called directly after the completion of a License Plate Move. Originally intended to handle Reallocation, this Workflow can be used to set off any extra event desired upon the Move's completion. |
| : | This Workflow is called when clicking Consolidate Shipments on a Master Order, or Auto Assign Shipment for an Outbound Shipment; it is used to determine the best methods by which to group Shipments, or can be used to create new Shipments. |
| Outbound Packaged Quantities Request: | This Workflow is called just prior to Cartonization when Processing an Outbound Order, looking at Order Lines and Packaging to make changes to either when desired. |
| Prepare Shipping Packages for Manifest: | Called when Manifesting Shipping Containers in the Rate and Ship section of the Shipping Management module. |
| Process Print Request: | Called whenever a Print request is processed, this Workflow can be used to determine what items to print and how to print them. |
| Recurring Storage Custom Billing: | Calculates the Rate at the end of a Billing Strategy - typically used to apply variable Rates for Materials that may have fluctuating value, such as gold. |
| Shipping Container Weight Verification: | Allows customization of the weight tolerance for the Weight Verification section of the Shipping Management module. |
Workflow Details
The Workflow Details section displays editable information about the open Workflow. This includes the Workflow's Name, and a short Description of the Workflow. This details section can be toggled open or closed by clicking the Arrow button.
Designer Canvas
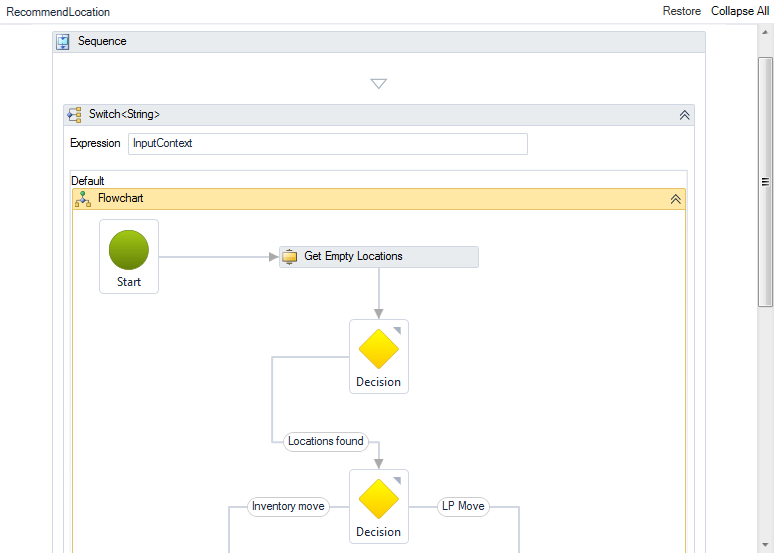
The Designer Canvas is where the Workflow building or editing actually takes place. This is mostly intuitive, done by dragging and dropping elements from the Toolbox, and then filling out and connecting those elements.
The scope of the Designer Canvas can be changed to focus on a specific element by double-clicking it. Breadcrumbs along the top of the Designer will indicate what part of the Workflow you are viewing. In the upper right-hand corner of the Designer, you can click Expand All or Collapse All to either simplify the information you are viewing, or show each Activity's details. You can also expand or collapse individual Activities in the Designer by clicking the double chevron button: ![]() .
.
The elements themselves can be edited, either by filling in open fields directly in the Designer, or by selecting it and working in the Activity Parameters pane.
An element with the error icon  will not function properly. By holding the cursor over the icon, information about the error will be displayed.
For a listing of all data in Footprint that can be used by Workflows, see the Workflow Data Primitives dictionary.
Workflow Arguments

At the bottom of the screen, a blue bar running the length of the Designer Canvas contains several buttons. On the right end of the bar, there are options to configure the display of the Canvas:

|
The zoom of the display can be changed from the drop-down list, or by entering a percentage value in the box. |

|
Clicking the magnifying glass icon will return the zoom to 100%. |

|
The square button directly to the right of the zoom value box will adjust the zoom to fit the entire Workflow within the Canvas. |

|
The final button on the right opens a small pop-up window, giving you an overview display of the Workflow, which can be used to adjust the area of the Workflow being viewed by dragging the yellow box (representing the Canvas view) to the desired location. |
On the left side of the blue bar, there are three button which will toggle the display of information relevant to the open Workflow.

Workflow Variables are bits of information that the Workflow can use to help make decisions. This information is pulled from Input Arguments available to the Workflow.
| Name: | The name of the Variable within this Workflow - should be a unique identifier that can be easily recognized. Using multiple Variables with the same name may stop the Workflow from functioning properly. |
| Variable type: | The type of information being conveyed in the Variable - can be a Visual Basic Data Type (see the Visual Basic Data Type Summaries for more information), or a custom Footprint Data Type. |
| Scope: | The scope of the Variable defines the portion of the Workflow in which the Variable can be used. |
| Default: | A default value for the Variable, used when no value has been provided by the system. |
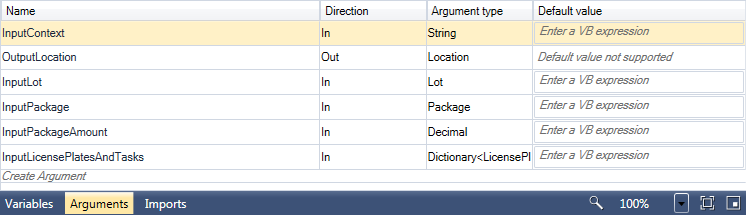
The Arguments of a Workflow represent the Input and Output information the Workflow will be dealing with.
| Name: | The name of the Argument, indicating what the information concerns. |
| Direction: | Either In, indicating the Argument is an Input, or Out, indicating an Output. |
| Argument type: | The type of information being conveyed in the Argument - can be a Visual Basic Data Type (see the Visual Basic Data Type Summaries for more information), or a custom Footprint Data Type. |
| Default value: | A default value for the Argument, used when no value has been provided by the system. |
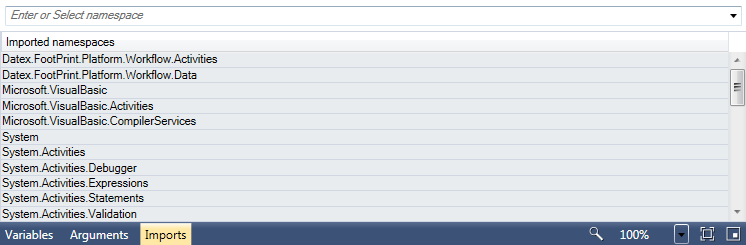
The Workflow Imports tab contains a list of all Namespaces available for use within the open Workflow. These Namespaces will define the information types that the Workflow can use.
Example
The Datex.Footprint.Platform.Workflow.Data Namespace contains most of the custom Footprint Data Types that are utilized by Footprint Workflows.
Toolbox

The Toolbox contains each Activity that can be performed within a Workflow. These Activities include basic Workflow Activities as well as specific Activities designed for Footprint.
These Activities can be implemented in the open Workflow simply by dragging them into the Designer Canvas.
For a list of all currently available Footprint-specific activities, along with a short explanation of each, see the Workflow Activities dictionary. Standard Windows Workflow Foundation activities can be found in Microsoft's Built-In Activity Library documentation.
Activity Parameters
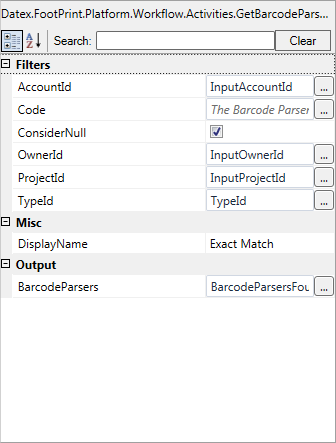
The Activity Parameters is a listing of all information used by the element selected in the Designer Canvas. These options will vary depending on the type of Activity.
By clicking the buttons in the upper right-hand corner of the pane, the Parameters can be organized by category  , or alphabetically
  . The Search Bar allows you to filter the displayed Parameters; clicking the Clear button removes the search, displaying all available Parameters.
The information for each Parameter can be edited directly in this pane, or, by clicking the ellipses box (...), a pop-up window can be opened in which to edit the information.
An element with the error icon will not function properly. By holding the cursor over the icon, information about the error will be displayed.
For a listing of all data in Footprint that can be used by Workflows, see the Workflow Data Primitives dictionary.
| Last Updated: |
| 06/06/2025 |
Related Concepts
Copyright © 2025 Datex Corporation