Import Inventory
Imported Inventory will appear alongside other Inventory for review and management.
Please Note
-
For the most comprehensive import, we recommend downloading the latest export file with up-to-date features and fields.
-
The following guide will walk you through the process with a focus on required fields. Due to minor differences between versions and instances, the order of the columns may vary, however the required fields should remain consistent regardless of their relevant column's location.
-
The inventory import process is intended for creating new records. Enter as many details as possible when importing, as attempting to update existing records will result in an error.
-
All date values must follow the MM/DD/YYYY format. If the spreadsheet contains dates, please double-check they are formatted accordingly before proceeding with the import process.
-
Imports are limited to 5000 lines. Please break down larger imports into files with no more than 5000 lines.
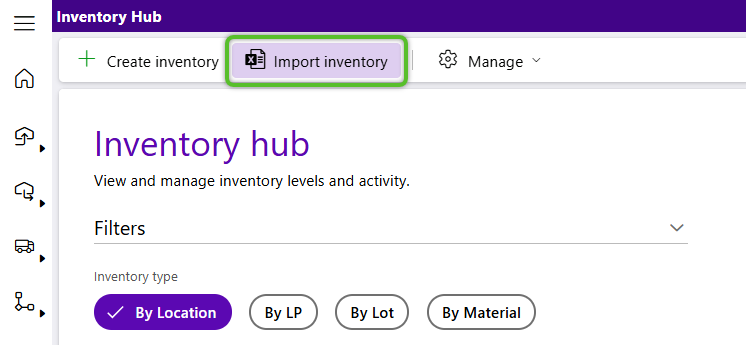
1. From the Inventory Hub, click the Import Inventory option in the top toolbar.
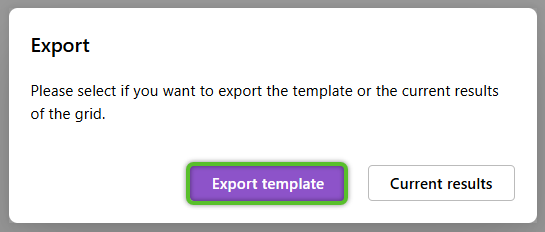
2. Click the Export button at the top of the Inventory Import Staging page.

3. Click Export template button in the Export window. .
The Import Inventory Template file will be downloaded to the user's default download location.
4. Locate the file named 'ExcelInventoryImport_excel_inventory_import_staging_gridComponent_export' and double click on it to open it. Please note that the file name may be slightly different for your instance.

Important
While the name of the file can be changed, changing the name of any of the column headers will cause the import to fail.
5. Owner, Project, and Warehouse are required to identify who the inventory being imported is for and the warehouse it's being imported to. Locate their columns and enter the required values exactly as they appear in Footprint.

Important
When adding data to the import file, all capitalization, spelling, and spacing-- including spaces at the beginning or end that may not be easily seen, must match exactly with the Warehouse, ProjectLookupCode, and MaterialLookupCode fields in Footprint or an error will occur when importing.
6. The Location, LicensePlate, LicensePlateStatus, and Material are required to identify what the imported inventory is, where it is going, and what status it will be in. When inputting LicensePlateStatus be sure the Status used matches one of those in Footprint exactly. As before, locate the applicable columns and ensure the values you input match those in Footprint exactly.

7. Lot, VendorLot, LotStatus, and Vat fields are optional. However, if the inventory being imported is Lot Controlled, Lot, VendorLot, and LotStatus values should be entered. Vat will only need to be utilized if an organization is using the field. LotStatus must match one of the existing Statuses in Footprint. If needed, locate the applicable columns and provide the values, otherwise they may be left blank.
If these details are not going to be imported, be sure to delete the 'String' value from these fields before importing.

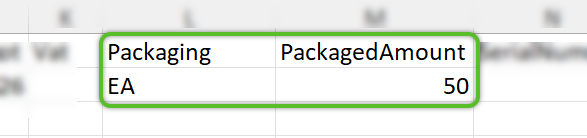
8. Packaging and PackagedAmount are required to identify the quantity and packaging type of the inventory being imported. Locate the applicable columns and enter the Packaging type exactly as it appears in Footprint and a numerical value for PackagedAmount.
9. SerialNumber is only applicable when importing serial controlled inventory. NetWeight, GrossWeight, and Weight UOM are required if inventory being imported is variable weight. If left blank, default weights for the packaging entered will be used. If needed, locate the applicable columns and enter the needed values.
If these details are not going to be imported, be sure to delete the pre-existing values before importing.

10. ReasonCode is required. Locate the applicable column and enter the Reason Code value exactly as it appears in Footprint.

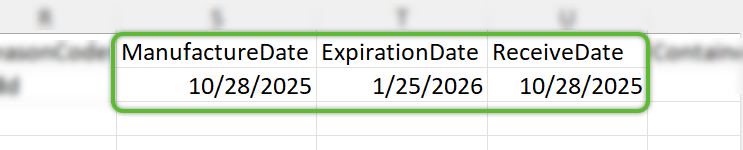
11. ManufactureDate, ExpirationDate, and ReceiveDate are technically optional. However, if the material being imported is Lot Controlled and an organization is tracking these dates, the correct values should be entered, otherwise they will use the current date to generate these values. If needed, located the applicable columns and enter the requested dates in a MM/DD/YYYY format.
12. (Optional:) ContainerTypeName and ContainerTypeWeight are generally optional unless specifically utilized or required by an organization.

13. (Optional:) If an organization has Custom Fields setup relevant to the import, known as UDFs in the import file, values for the fields can be imported. There will be multiple UDF Name, Value, and Entity fields at the end of all the other columns. To use the UDF fields all three values must be input. When first performing imports using these types of values it is recommended to reach out to Datex for assistance inputting the correct values.

14. Save and close the spreadsheet, then click Import in the toolbar to select the file for upload.
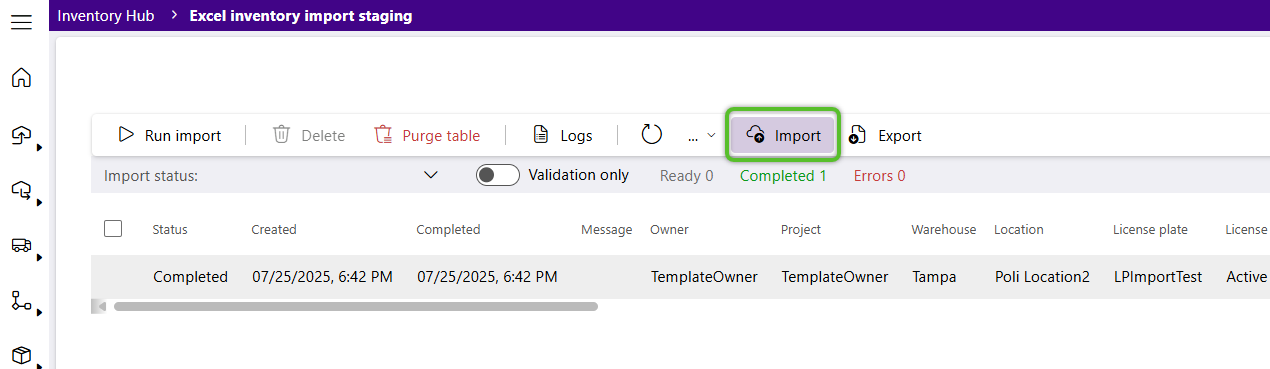
The Inventory details will display with a Status of Ready.
15. Click the Run import button to submit data.
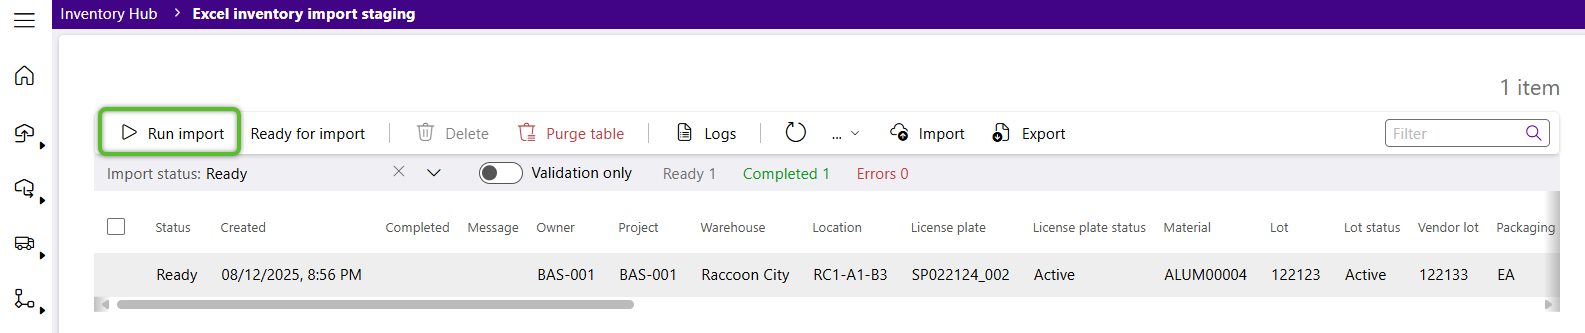
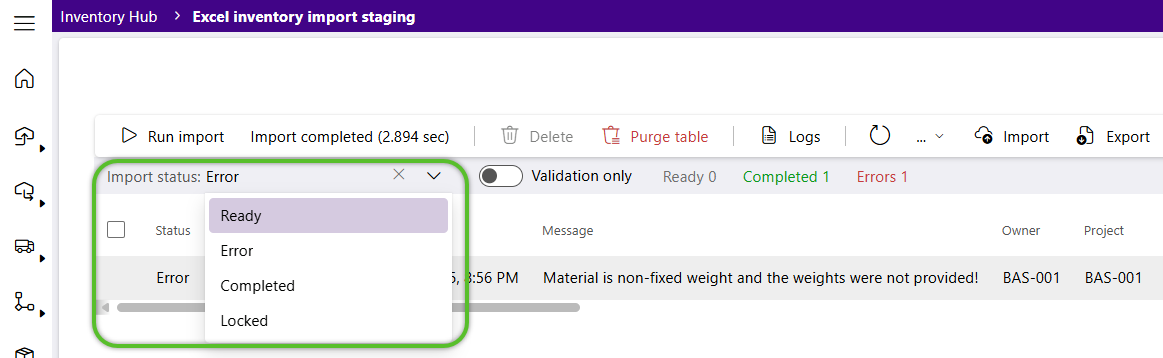
16. Once the import data is submitted it can be viewed as either completed or reviewed for errors by switching the Import Status filter. If there are any errors, correct as directed on the import template file and resubmit.
The newly imported Inventory will now display alongside other inventory in the Inventory Hub.
| Last Updated: |
| 11/04/2025 |
Copyright © 2026 Datex Corporation