Sections
Related Tutorials
- Mobile Inventory Adjustment
- Mobile Inventory Addition
Overview
The Adjust section allows you to make Inventory Adjustments or add new Inventory to a Location or License Plate, directly from the mobile device. Adjustment Values must be set for the User making the Adjustments this way in the Adjustment Values section.
From here you can...
Inventory Search
This screen is where you search for Inventory to Adjust.
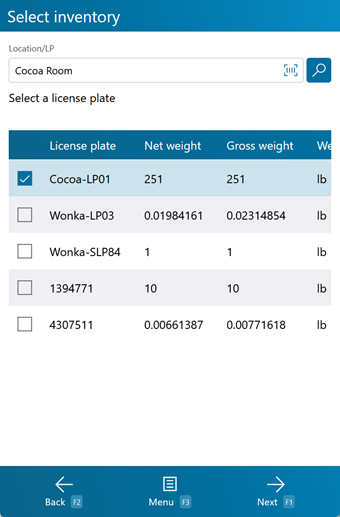
Search by entering a Location or License Plate in the Location/LP field, and pressing the Tab key if the Inventory does not populate automatically.
Tapping Next: F1 or pressing the F1 key takes you to the Adjustment screen, where you can Adjust the Inventory you have selected here.
Tapping Menu: F3 or pressing the F3 key displays a menu with these additional options:
- Add Inventory: F4 will open the Add Inventory Screen.
- Edit Serial: F5 will open the Serial Number Editor.
- Toggle LPs/Serials: F9 will toggle between showing searched License Plates or searched Serial Numbers.
- Inquiry: F11 opens the Inquiry Menu.
Tapping Back: F2 or pressing the F2 key takes you back to the main menu.
| Material: | The LookUp Code of the Material. |
| Lot: | The Material's Lot. |
| Quantity: | The number of Packages of the Material. |
| Pack: | The Packaging Type of the Material. |
| Project: | The Project under which the Material is classified. |
| Serial Number: | The Serial Number of the Material. |
| Material: | The LookUp Code of the Material. |
| Lot: | The Material's Lot. |
| Net Weigh: | The weight of the Materials on the License Plate, not including Packaging. |
| Gross Weight: | The weight of the Materials on the License Plate, including Packaging. |
| Weight UOM: | The unit by which the weight is measured. |
| Net Volume: | The volume of the Materials on the License Plate, not including Packaging. |
| Gross Volume: | The volume of the Materials on the License Plate, including Packaging. |
| Volume UOM: | The unit by which the volume is measured. |
| License Plate: | The License Plate. |
| Net Weight: | The weight of the Materials on the License Plate, not including Packaging. |
| Gross Weight: | The weight of the Materials on the License Plate, including Packaging. |
| Weight UOM: | The unit by which the weight is measured. |
| Net Volume: | The volume of the Materials on the License Plate, not including Packaging. |
| Gross Volume: | The volume of the Materials on the License Plate, including Packaging. |
| Volume UOM: | The unit by which the volume is measured. |
Adjust Inventory
This screen is where you make Adjustments to the Inventory you had selected on the Inventory Search screen.
Note
Serialized Materials cannot be Adjusted.
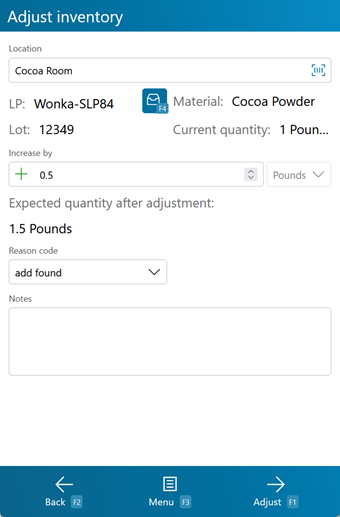
Tapping Adjust: F1 or pressing the F1 key Adjusts the Materials by the amount specified here.
Tapping Menu: F3 or pressing the F3 key displays a menu with these additional options:
- Container Type: F4 will bring up the Container Selection menu to edit the Container for this LP.
- Inquiry: F11 opens the Inquiry Menu.
- Decrease Quantity toggles the green + Increase By icon to a red - Decrease By icon, indicating a decrease in Quantity.
Tapping Back: F2 or pressing the F2 key takes you back to the Inventory Search screen.
| Location: | The Location at which the Materials are being Adjusted. |
| LP: | The License Plate on which the Materials are being Adjusted. The blue button next to the field allows you to select a Container type for the License Plate. |
| Material: | A system-generated field displaying a description of the Material. |
| Lot: | The Lot for the Material. Tapping or pressing F7 takes you to the Create Lot screen where you can create a new Lot and Vendor Lot, as outlined below. |
| Current Quantity: | The number of Packages of the Material currently on the License Plate. The field updates as you add or subtract Materials. |
| Increase By / Decrease By: | The number of Materials being added or subtracted from the License Plate. If you want to subtract Materials, tap the green + button to switch from increment mode to decrement mode. Tapping the button again (now a red - button) will switch back to increment mode to add Materials. The Quantity will automatically update when tabbing out of this field. Note: If a value is entered in the field, tapping the +/- button will submit the change to the Quantity, so make sure to set to increment or decrement before typing in the field. |
| Expected Quantity After Adjustment: | The number of Packages of the Material expected on the License Plate after the adjustment. The field updates as you add or subtract Materials. |
| Reason Code: | Why the Materials are being Adjusted. |
| Notes: | Any Notes for the Materials. |
*Those in red are required fields.
Adjust Serial Number
This screen allows you to Adjust information about the Serial Number you had selected on the Inventory Search screen.
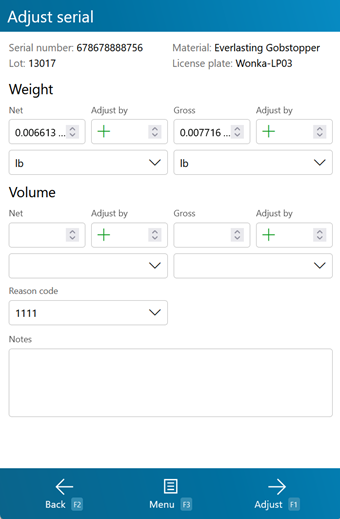
Tapping Adjust: F1 or pressing the F1 key Adjusts the Material by the amount specified here.
Tapping Menu: F3 or pressing the F3 key displays a menu with these additional options:
- Print Label: F6 allows you to Print a Label for the Material.
- Inquiry: F11 opens the Inquiry Menu.
Tapping Back: F2 or pressing the F2 key takes you back to the Inventory Search screen.
| Serial Number: | The Serial Number of the Material. |
| Material: | The LookUp Code of the Material. |
| Lot: | The Lot for the Material. |
| License Plate: | The License Plate on which the Material is stored. |
| Net (Weight): | The weight of the Materials on the License Plate, not including Packaging. |
| Gross (Weight): | The weight of the Materials on the License Plate, including Packaging. |
| +/-: | The amount being added or subtracted from the Net or Gross weight. If you want to subtract weight, you need to place a minus sign (-) in front of the value. |
| Weight UOM: | The unit by which the weight is measured. |
| Net (Volume): | The volume of the Materials on the License Plate, not including Packaging. |
| Gross (Volume): | The volume of the Materials on the License Plate, including Packaging. |
| +/-: | The amount being added or subtracted from the Net or Gross volume. If you want to subtract volume, you need to place a minus sign (-) in front of the value. |
| Volume UOM: | The unit by which the volume is measured. |
| Reason Code: | Why the Material is being Adjusted. |
| Notes: | Any Notes for the Material. |
*Those in red are required fields.
Add Inventory
This screen is where you can create new Inventory in the system
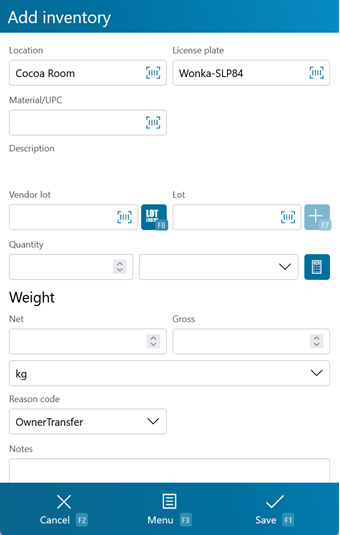
Tapping Save: F1 or pressing the F1 key adds the new Materials to the Warehouse, with all the entered details.
Tapping Menu: F3 or pressing the F3 key displays a menu with these additional options:
- Clear LP: F4 clears the License Plate entered in the LP field.
- Clear Location: F5 clears the Location entered in the Location field.
- Add Notes: F6 brings up the Add Notes screen so any applicable notes can be added to the adjustment (see below).
- Create Lot: F7 opens the Create Lot screen (see below).
- Find Material Lots: F8 searches for Lots that contain the Material entered.
- Toggle Volume/Weight toggles between the entry of Weight values or Volume values.
- Inquiry: F11 opens the Inquiry Menu.
Tapping Cancel: F2 or pressing the F2 key takes you back to the Inventory Search screen.
| Location: | The Location to which the Materials are being added. |
| License Plate: | The License Plate onto which the Materials are being added. You can enter an existing License Plate, or create a new one. |
| Material/UPC: | The Material's LookUp Code. Tapping the M button allows you to toggle between Material LookUp Code and Universal Product Code (UPC). |
| Description: | A system-generated field displaying a description of the Material. |
| Vendor Lot: | The Vendor Lot for the Material. Tapping or pressing F8 allows you to select from a list of Vendor Lots. |
| Lot: | The Lot for the Material. Tapping or pressing F7 takes you to the Create Lot screen where you can create a new Lot and Vendor Lot, as outlined below. |
| Quantity: | The actual number of Packages of the Material being added. The field next to it is a drop-down list from which you can select the Packaging Type. |
| Gross (Weight): | The Gross Weight of the Materials being added, including their Packaging. This box should be filled out when adding a variable weight Material. |
| Net (Weight): | The Net Weight of the Materials being added, without its Packaging. This box should be filled out when adding a variable weight Material. The weight Unit of Measurement is displayed to the right of the Gross Weight field. |
| Reason Code: | Why the new Material is being added. |
| Notes: | Any Notes for the added Materials. Tapping or pressing F6 allows you to enter new Notes (see below). |
*Those in red are required fields.
Pressing the F8 key allows you to view and add Notes for the selected item.
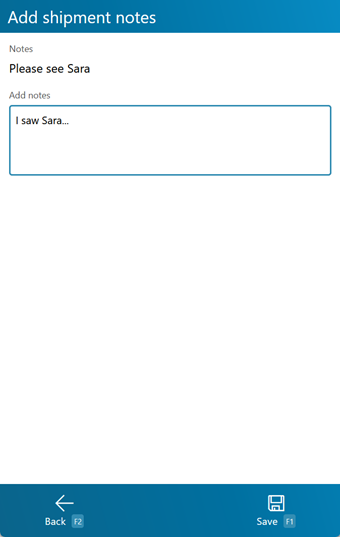
The current Notes are displayed in the top pane, and you can enter any new Notes in the lower pane.
Tapping Save: F1 or pressing the F1 key saves the changes you've made here.
Tapping Back: F2 or pressing the F2 key discards all changes you've made here.
Tapping pressing F7 allows you to create a new Lot and Vendor Lot for the Material.

Tapping Save: F1 or pressing the F1 key saves the changes you've made here, creating a new Lot (and Vendor Lot if desired).
Tapping Back: F2 or pressing the F2 key discards all changes you've made here.
| Project: | Displays the Project under which the Material is classified. |
| Name: | Displays the Name for the Material. |
| Material: | Displays the LookUp Code of the Material. |
| Description: | Displays the Description for the Material. |
| Vendor Lot: | Tapping the "New" box to place a check mark in it allows you to create a new Vendor Lot, whose LookUp Code can be entered in the Vendor Lot field. Leaving this field blank allows the system to create a LookUp Code for you. |
| Manufacturing Date: | The date on which the Vendor Lot was Manufactured. |
| Expiration Date: | The date on which the Vendor Lot Expires. |
| VAT: | The Vat in which the Materials were created, if applicable. |
| Notes: | An open field for Notes about the Lot. |
| Lot: | The Lot LookUp Code. Leaving this field blank allows the system to create a LookUp Code for you. |
| Lot Status: | A drop-down field for changing the status of the Lot. This defaults to Active. |
Serial Information
If the Materials you are adding are Serialized, or have Variable Weight or Dimensions, you will be brought the Serial Information screen once they are added.

You can select the Weight Unit of Measurement, the Dimension Unit of Measurement , and the Volume Unit of Measurement from the drop-down lists at the top of the screen.
Tapping Submit: F1 or pressing the F1 key saves the Materials with their Serial information.
Tapping Menu: F3 or pressing the F3 key opens a menu with the following additional options:
- Reset Serials: resets the assigned serial numbers.
- Inquiry: F11 opens the Inquiry Menu.
Tapping Back: F2 or pressing the F2 key takes you back to the previous screen.
| Serial: | A unique Serial Number to identify the item. |
| Net Weight: | The Net Weight of the item, without its Packaging. This box should be filled out for variable weight Materials. |
| Gross Weight: | The Gross Weight of the item, including their Packaging. This box should be filled out for variable weight Materials. |
| Gross Volume: | The Gross Volume of the item, including their Packaging. This box should be filled out for variable volume Materials. |
| Length: | The Length of the item. This box should be filled out for variable dimension Materials. |
| Height: | The Height of the item. This box should be filled out for variable dimension Materials. |
| Width: | The Width of the item. This box should be filled out for variable dimension Materials. |
| Last Updated: |
| 06/06/2025 |
Copyright © 2026 Datex Corporation