Sections
Related Tutorials
Receiving is the step in the Inbound Operations process when you actually verify what Materials have been Shipped to your Warehouse.
Overview
Receiving is the process in which you confirm a specific Shipment's contents, assign that Inventory to License Plates, and enter them into your system.
The Receiving section is where you will search for Receiving Tasks and execute them, confirming details about the Tasks such as Quantity and Lots.
From here you can...
Shipment Search
This screen allows you to search for Shipments that contain Receive Tasks.
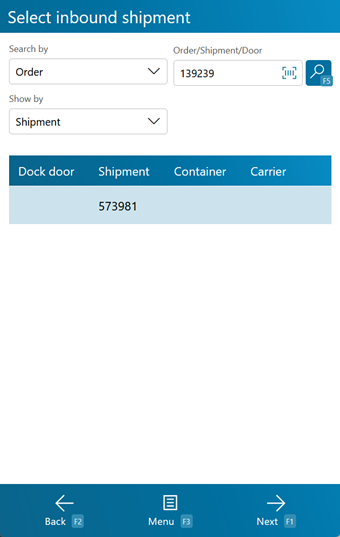
The Search by drop-down box allows you to search for Inbound Shipments with Receive Tasks by Shipment, Order, or Dock Door.
The field next to the drop-down list is where you enter the Shipment ID, Order LookUp Code, or the Dock Door name.
Tapping F5 or pressing the F5 key loads all Shipments matching the information provided.
The Show by dropdown allows you to sort search results by Shipments or Appointments.
Tapping Next or pressing the F1 key takes you to the Receive Tasks screen for the selected Shipment. When attempting to open the Receive Tasks screen for a Shipment that has yet to be Processed, the system will prompt the user to Process the Shipment at that time. If the Order Class prevents users from Processing Inbound Orders from the mobile device, Shipments that have not yet been Processed will not be displayed as search results at all (see the Order Classes section).
Tapping Menu or pressing the F3 key opens a menu with the following additional options:
- Refresh Shipments: F5 refreshes the list of Shipments.
- Notes: F8 allows you to view and add notes for the Order or Shipment.
- Details: F9 allows you to view the Order or Shipment details.
- Add to Container: F10 allows you to add the Shipment to an existing Load Container.
- Inquiry: F11 opens the Inquiry Menu.
Tapping Back or pressing the F2 key takes you back to the main menu.
| Dock Door: | The Dock Door at which the Shipment is scheduled to arrive. |
| Shipment: | The Shipment ID. |
| Container: | The LookUp Code for the Load Container, if any. |
| Carrier: | The Carrier delivering this Shipment. |
Pressing the F8 key allows you to view and add Notes for the selected item.
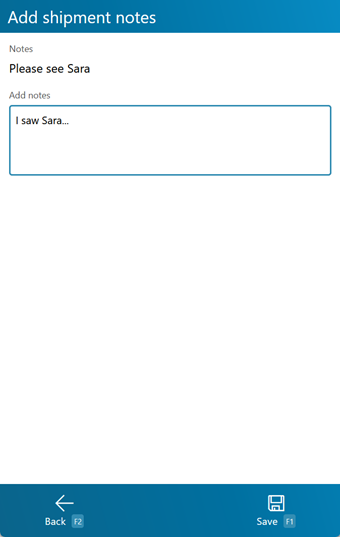
The current Notes are displayed in the top pane, and you can enter any new Notes in the lower pane.
Tapping Save: F1 or pressing the F1 key saves the changes you've made here.
Tapping Back: F2 or pressing the F2 key discards all changes you've made here.
Pressing the F9 key allows you to view and edit details about the Shipment.
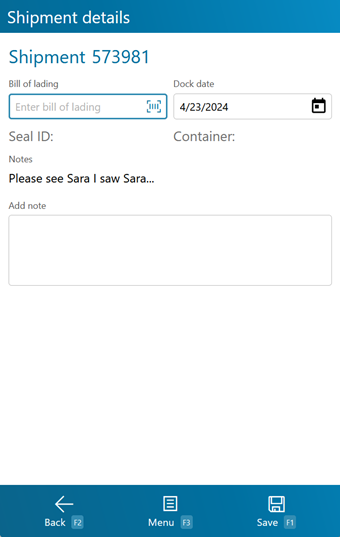
Tapping Save: F1 or pressing the F1 key saves the changes you've made here.
Tapping Menu: F3 or pressing the F3 key opens a menu with the following additional options:
- Close & New Shipment: F4 Completes the Shipment in the system, and transfers ant Outstanding Order Lines to a new Shipment.
- Close & Cancel Outstanding: F5 refreshes the list of Shipments.
- Inquiry: F11 opens the Inquiry Menu.
Tapping Back: F2 or pressing the F2 key discards all changes you've made here.
| Bill of Lading: | The Bill of Lading Number for the Shipment. |
| Dock Date: | The scheduled Dock Appointment Date for the Shipment. |
| Seal ID: | The Seal ID number for the Shipment. This field is not editable. |
| Container: | The Load Container for the Shipment. |
| Notes: | Displays all the Notes in the system for the Shipment. |
| Add Note: | An open field in which you can add Notes to the Shipment. |
Pressing the F10 key allows you to add the Shipment to an existing Load Container.
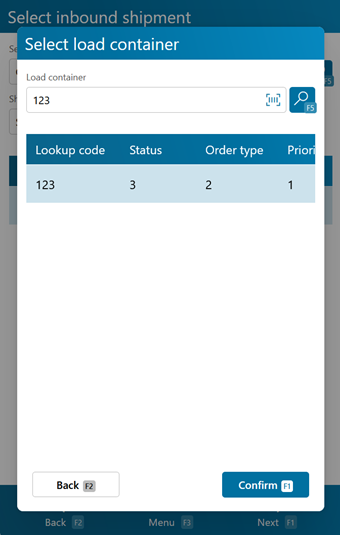
Enter the Load Container LookUp Code in the field, and tap or press F5 to load all matching Load Containers.
Tapping Confirm: F1 or pressing the F1 key adds the Shipment to the selected Load Container.
Tapping Back: F2 or pressing the F2 key discards all changes you've made here.
| LookUp Code: | The Load Container's LookUp Code. |
| Status: | The Status of the Load Container. |
| Order Type: | The Order Type associated with the Load Container. |
| Priority: | The Priority of the Load Container. |
| Container Size: | The Size of the Load Container. |
Receive Tasks
This screen displays all the Receive Tasks for the open Shipment, allowing you to select them and begin Receiving.
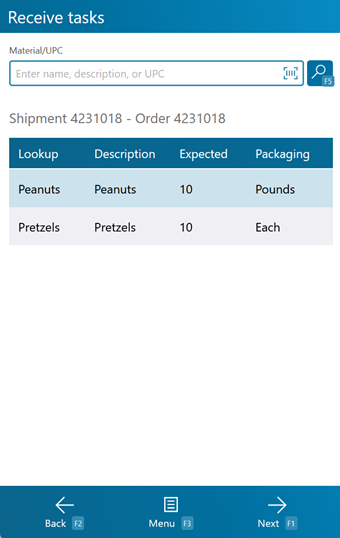
The Material/UPC field allows you to filter the displayed Receive Tasks by entering a Material LookUp Code, a Universal Product Code (UPC), or a Material Description and tapping or pressing F5. The UPC must be configured for the Material in the Materials section.
Tapping the F7 key takes you to the Default Data screen, allowing you to enter a Receipt Number. All items Received will have this Receipt Number by default, but it can be changed.
Tapping Next: F1 or pressing the F1 key takes you to the Receive screen for the selected Receive Task.
Tapping Menu: F3 or pressing the F3 key opens a menu with the following additional options:
- Pallet Tracking: F4 lets you create a Pallet Transaction for the Shipment.
- Refresh: F5 refreshes the list of Shipments.
- Capture Temperature: F6 allows you to add a Temperature Capture for the Shipment.
- Set Receipt Number: F7 allows you to enter a Receipt Number for the receipt.
- Notes: F8 allows you to view and add notes for the Order or Shipment.
- Add Order Line: F9 allows you to add a Line to the Shipment.
- Accessorial Charges: F10 allows you to complete or add new Accessorial Charges to the Shipment.
- Inquiry: F11 opens the Inquiry menu screen.
Tapping Back: F2 or pressing the F2 key takes you back to the Shipment Search screen.
| Lookup: | The Material's LookUp Code. |
| Description: | A description of the Material. |
| Expected: | The Expected number of Packages of the Material being Received. |
| Lot: | The Lot for the Material. |
| Vendor Lot: | The Vendor Lot for the Material. |
| Packaging: | The Packaging Type of the Material. |
| Material Name: | The Name of the Material. |
| Received: | The number of Packages of the Material that have been Received. |
| PO Identifier: | The Purchase Order ID associated with the Materials. |
| Due Date: | The date specified that the Materials are due. |
Tapping Pallet Tracking or pressing the F4 key brings you to the Pallet Tracking screen, allowing you to create a Pallet Transaction for the Shipment.
![]()
Tapping Confirm: F1 or pressing the F1 key adds a Pallet Transaction with the provided details to the system.
Tapping Back: F2 or pressing the F2 key discards all changes you've made here.
| Pallet Class: | A drop-down window in which you can select the Pallet Class that is being added to or subtracted from your Warehouse. Pallet Classes must be set up beforehand in the Pallet Classes section. |
| In/Out: | Enter the number of Pallets of the selected Class coming in or out of your Warehouse. |
| Owner: | A drop-down list from which you can select the Owner of the Pallets. |
| Project: | A drop-down list from which you can select the Project under which the Pallets are classified. |
| Account: | A drop-down list from which you can select an Account to associate with the Pallet Transaction. |
| Carrier: | A drop-down list from which you can select the Carrier who is Shipping the Pallets. |
| Shipment: | The Shipment the Pallets came or left with. |
| Reference: | An open field to insert a Reference Number for the Pallet Transaction. |
| Notes: | An open field for Notes about the Transaction. |
Opening the Capture Temperature screen allows you to record temperature readings for the operation, and tie them to the Shipment or License Plate.
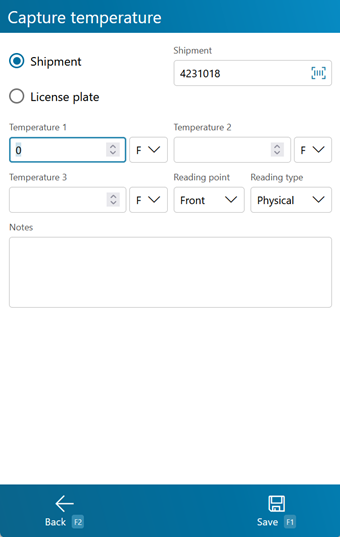
Selecting Shipment or LP determines whether the Temperature Capture information will be associated with the Shipment or the License Plate in question. The field below this choice will be automatically populate from the previous screen, but can be overwritten to assign the capture to whichever Shipment or License Plate you'd like.
You can enter up to three Temperature Readings, and select whether the temperature was recorded in Fahrenheit or Celsius.
The Reading Point and Reading Type can also be chosen for the reading, further specifying information by selecting from various customizable options configured on the Desktop.
Additional Notes can be recorded for the reading.
Tapping Save: F1 or pressing the F1 key saves the temperatures entered for the chosen Shipment or License Plate. Additional Temperature Readings can be recorded.
Tapping Back: F2 or pressing the F2 key closes the Temperature Capture screen, returning you to the previous screen. Any unsaved changes are discarded.
Pressing the F7 key allows you to enter a specific Receipt Number to be assigned to any Receiving Tasks you complete.
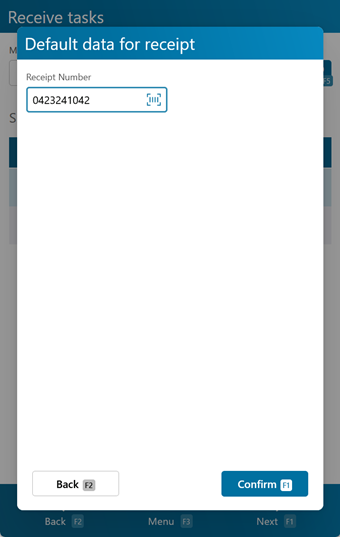
Enter the Receipt Number at the top of the screen.
Tapping Confirm: F1 or pressing the F1 key saves the Receipt Number to be applied to the Receiving Tasks, returning you to the Receive Tasks screen.
Tapping Back: F2 or pressing the F2 key discards the Receipt Number and returns you to the Receive Tasks screen.
Pressing the F8 key allows you to view and add Notes for the selected item.
The current Notes are displayed in the top pane, and you can enter any new Notes in the lower pane.
Tapping Save: F1 or pressing the F1 key saves the changes you've made here.
Tapping Back: F2 or pressing the F2 key discards all changes you've made here.
By tapping Create Line, or pressing the F9 key, you can add a new Shipment Line to Receive additional Materials not already specified in the Shipment.
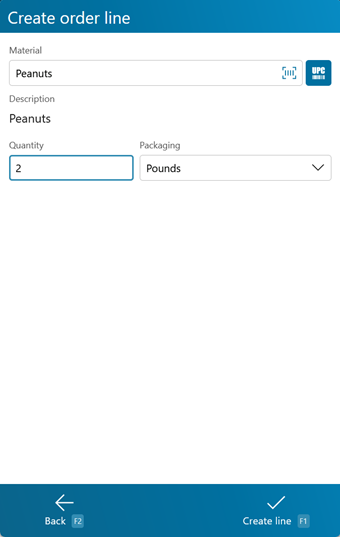
Tapping Create Line: F1 or pressing the F1 key adds the Shipment Line to the Shipment, with the entered details.
Tapping Back: F2 or pressing the F2 key takes you back to the Receive Tasks screen.
| Material: | Scan or enter the Material LookUp Code, or tap the M button to use the Universal Product Code (if configured). |
| Description: | A system-generated field displaying a description of the Material. |
| Quantity: | Enter the number of Packages of the Material being Received. |
| Packaging: | A drop-down menu from which you can select the Packaging Type of the Material Received. |
Pressing the F10 button opens the Accessorial Tasks screen.
This screen displays all Accessorial Tasks for the selected Shipment or Work Order.
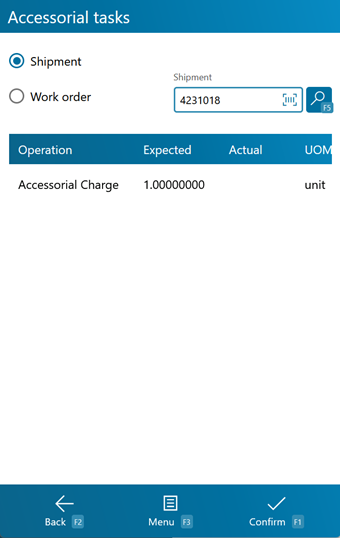
You can select either Shipment or Work Order from the drop-down list at the top of the screen, then enter the appropriate LookUp Code in the field next to it. Tapping or pressing F5 populates a list of all All Accessorial Tasks assigned to that Order or Shipment.
Tapping Confirm: F1 or pressing the F1 key completes all Accessorial Tasks that have an Amount entered.
Tapping Menu: F3 or pressing the F3 key opens a menu with the following additional options:
- Add Accessorial Charge: F4 will allow you to create a new Accessorial Task for the entered Order or Shipment on the fly.
- Search: F5 refreshes the list of Accessorial Tasks assigned to the entered Order or Shipment.
- Inquiry: F11 opens the Inquiry Menu.
Tapping Back: F2 or pressing the F2 key takes you back to the main menu.
| Operation: | The type of Accessorial Task assigned. |
| Expected: | The Expected amount of Work to be done, measured by the displayed Unit of Measurement. |
| Actual: | The Actual amount of Work performed, measured by the displayed Unit of Measurement. A negative amount can be entered here, generating a Billing Record that functions as a credit to the associated Owner, rather than a charge. |
| UOM: | The Unit of Measurement for the Accessorial Charge. |
*Those in red are required fields.
Add Accessorial Charge
Pressing the F4 key allows you to add an Accessorial Charge to the loaded Shipment or Work Order.
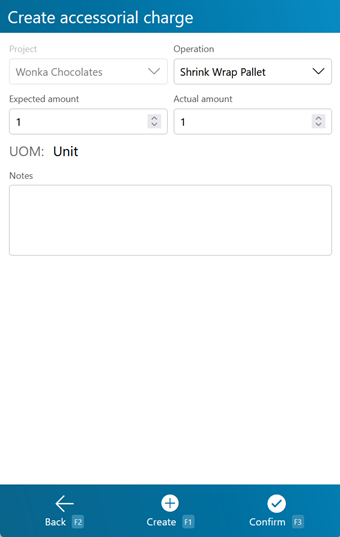
Tapping Create: F1 or pressing the F1 key adds the Task to the Shipment, Order, or Project, and also completes it using the Actual amount entered on this screen.
Tapping Confirm: F3 or pressing the F3 key adds the Task to the Shipment, Order, or Project, leaving it to be completed later.
Tapping Back: F2 or pressing the F2 key takes you back to the previous screen.
Project: The Project associated with the Accessorial Charge. Operation: A drop-down list from which you can select the type of Accessorial Task assigned. Expected Amount: The Expected amount of Work to be done, measured by the displayed Unit of Measurement. Actual Amount: The Actual amount of Work performed, measured by the displayed Unit of Measurement. A negative amount can be entered here, generating a Billing Record that functions as a credit to the associated Owner, rather than a charge. UOM: The Unit of Measurement for the Accessorial Charge. Notes: Any Notes you'd like to add about the Charge. *Those in red are required fields.
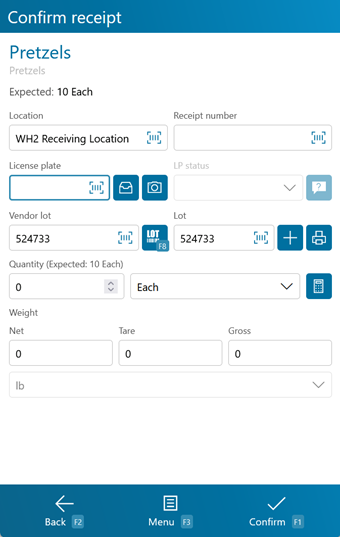
Receive
The Receive screen is where you enter all the information about the Materials you are Receiving. Depending on whether or not the Material has Dynamic Packaging, the fields for will appear in one of the two following ways.
Tapping Confirm: F1 or pressing the F1 key Receives the Materials, adding the new Inventory to the system.
Tapping Menu: F3 or pressing the F3 key opens a menu with the following additional options:
- Confirm & Putaway: F4 will confirm the current entered information and immediately open the Putaway screen.
- Print Lot: F5 will allow you to print the Lot information.
- Capture Temperature: F6 opens the Temperature Capture screen.
- Create Lot: F7 allows you to create a new Lot.
- Select Vendor Lot: F8 allows you to select a Lot/Vendor Lot from a list of existing Lots for the Material.
- Measurement Sample: F9 allows you to capture the Length, Width, Height, and Weight of the Material.
- Notes: F10 opens the note entry screen.
- Inquiry: F11 opens the Inquiry menu screen.
- Toggle Volume/Weight: F12 toggles the weight or volume entry for catch weight Materials.
- Packaging Details will give you information on the Material and Packaging.
- Clear Pallet will clear out any entered details.
- Container Type will allow you to select the container for the Material.
- Survey will allow you to view and complete any relevant surveys.
- Toggle Dynamic Packaging will allow you to toggle between standard and Dynamic Packaging for the Material.
Tapping Back: F2 or pressing the F2 key takes you back to the Receive Strategy screen.
| Material: | The Material's LookUp Code. |
| Location: | The Dock Door Location at which the Materials are being Received. |
| Receipt #: | The number identifying this particular receipt. |
| License Plate: | The License Plate onto which the Materials are being Received. You can enter an existing License Plate, or create a new one. |
| LP Status: | The status of the LP. If a status other than "Active" is selected, then a window can be opened to select the reason code for the change to that status (such as items on a QA Hold or Damaged Goods). |
| Vendor Lot: | The Vendor Lot for the Material. Tapping F8 Select or pressing the F8 key allows you to select from a list of Vendor Lots. |
| Lot: | The Lot for the Material. Tapping the Add button takes you to the Create Lot screen where you can create a new Lot and Vendor Lot, as outlined below. |
| Quantity (Expected): | The number of Packages of the Material that are anticipated to be Received. |
|---|---|
| Actual: | The number of Packages of the Material actually being Received. |
| Dynamic: | The number of base items in the Package to be Received. |
| UOM: | A drop-down list from which you can select the Packaging Type of the Material Received. |
| Net: | The Net Weight of the Materials being Received, without its Packaging. This box should be filled out when Receiving a variable weight Material. |
| Tare: | The Weight of the Materials' Packaging. |
| Gross: | The Gross Weight of the Materials being Received, including their Packaging. This box should be filled out when Receiving a variable weight Material. The weight Unit of Measurement is displayed to the right of the Gross Weight field. |
*Those in red are required fields.
†Those in blue are required fields if Dynamic Packaging has been enabled.
Tapping the blue ? button next to the LP Status field allows you to select one or more Reason Codes that will apply when changing the LP Status.
Tip
Reason Codes are defined under Settings > Master Files > Reason Codes. To appear here, the Reason Code should have a Parent ID of 19 - InventoryStatusChange.
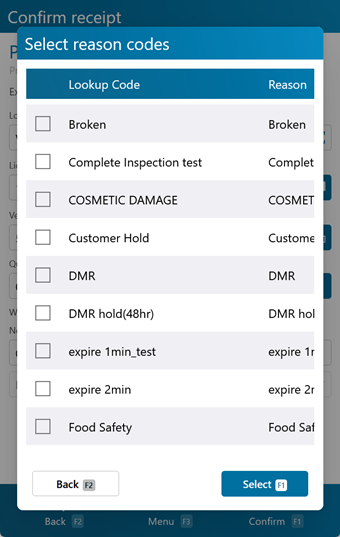
Tapping Select: F1 or pressing the F1 key saves the changes you've made here, adding the selected Reason Codes to the LP Status change.
Tapping Back: F2 or pressing the F2 key discards all changes you've made here.
| (Checkbox): | Placing a check in this column will apply the matching Lookup Code and Reason to the LP Status Change. |
| Lookup Code: | The Lookup Code of the Reason Code. |
| Reason: | The Label of the Reason Code. |
Tapping the blue + button next to the Lot field, or pressing the F7 key allows you to create a new Lot and Vendor Lot for the Material.

Tapping Save: F1 or pressing the F1 key saves the changes you've made here, creating a new Lot (and Vendor Lot if desired).
Tapping Back: F2 or pressing the F2 key discards all changes you've made here.
| Project: | Displays the Project under which the Material is classified. |
| Name: | Displays the Name for the Material. |
| Material: | Displays the LookUp Code of the Material. |
| Description: | Displays the Description for the Material. |
| Vendor Lot: | Tapping the "New" box to place a check mark in it allows you to create a new Vendor Lot, whose LookUp Code can be entered in the Vendor Lot field. Leaving this field blank allows the system to create a LookUp Code for you. |
| Manufacturing Date: | The date on which the Vendor Lot was Manufactured. |
| Expiration Date: | The date on which the Vendor Lot Expires. |
| VAT: | The Vat in which the Materials were created, if applicable. |
| Notes: | An open field for Notes about the Lot. |
| Lot: | The Lot LookUp Code. Leaving this field blank allows the system to create a LookUp Code for you. |
| Lot Status: | A drop-down field for changing the status of the Lot. This defaults to Active. |
Pressing the F9 key allows you to take a Sample Measurement of the Material you are Receiving.
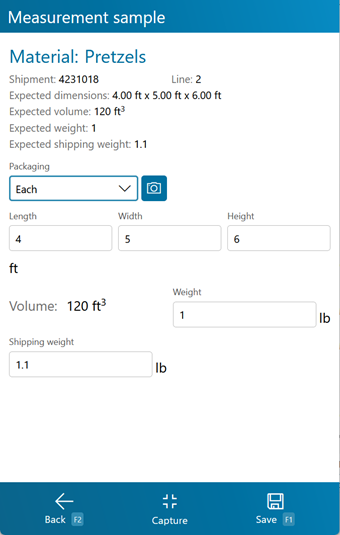
Tapping Save: F1 or pressing the F1 key saves the Measurement Sample.
Tapping Back: F2 or pressing the F2 key discards all changes you've made here.
The fields are all measured in the Units specified for the Material's Packaging Type, as set up in the Materials section.
Clear Pallet
If you have loaded all the Materials you can onto one Pallet, but have more Materials to Receive, pressing the F4 key allows you to Receive the Quantity of Materials entered onto the specified License Plate, and stays on the Receiving screen so that you can continue Receiving the rest of the Materials onto a new License Plate. This can be done as many times as necessary. When all Materials are Received, tap Confirm or press F1 instead of F4 again.
Serial Information
If the Materials you are Receiving are Serialized, or have Variable Weight or Dimensions, you will be brought the Serial Information screen once you Confirm Receiving.

You can select the Weight Unit of Measurement, the Dimension Unit of Measurement , and the Volume Unit of Measurement from the drop-down lists at the top of the screen.
Tapping Submit: F1 or pressing the F1 key saves the Materials with their Serial information.
Tapping Menu: F3 or pressing the F3 key opens a menu with the following additional options:
- Reset Serials: resets the assigned serial numbers.
- Inquiry: F11 opens the Inquiry Menu.
Tapping Back: F2 or pressing the F2 key takes you back to the previous screen.
| Serial: | A unique Serial Number to identify the item. |
| Net Weight: | The Net Weight of the item, without its Packaging. This box should be filled out for variable weight Materials. |
| Gross Weight: | The Gross Weight of the item, including their Packaging. This box should be filled out for variable weight Materials. |
| Gross Volume: | The Gross Volume of the item, including their Packaging. This box should be filled out for variable volume Materials. |
| Length: | The Length of the item. This box should be filled out for variable dimension Materials. |
| Height: | The Height of the item. This box should be filled out for variable dimension Materials. |
| Width: | The Width of the item. This box should be filled out for variable dimension Materials. |
| Last Updated: |
| 06/06/2025 |
Copyright © 2026 Datex Corporation