Sections
Related Tutorials
- Reports
- Setting Up Reports
Overview
Reports can deliver a wealth of information about your Warehouse and everything that goes on in it. Many Reports can be run directly from inside sections and modules of Footprint, by clicking Print buttons and selecting options from the drop-down lists. Reports can also be viewed directly from the Reports Module.
The Reports Module allows you to View Reports, Manage the Reports in Footprint, and customize or create new Reports. Custom Reports can only be viewed from the Reports Module.
For examples of each of Footprint's Standard Reports, see the Examples of Standard Reports guide page.
From here you can...
Main Screen Layout
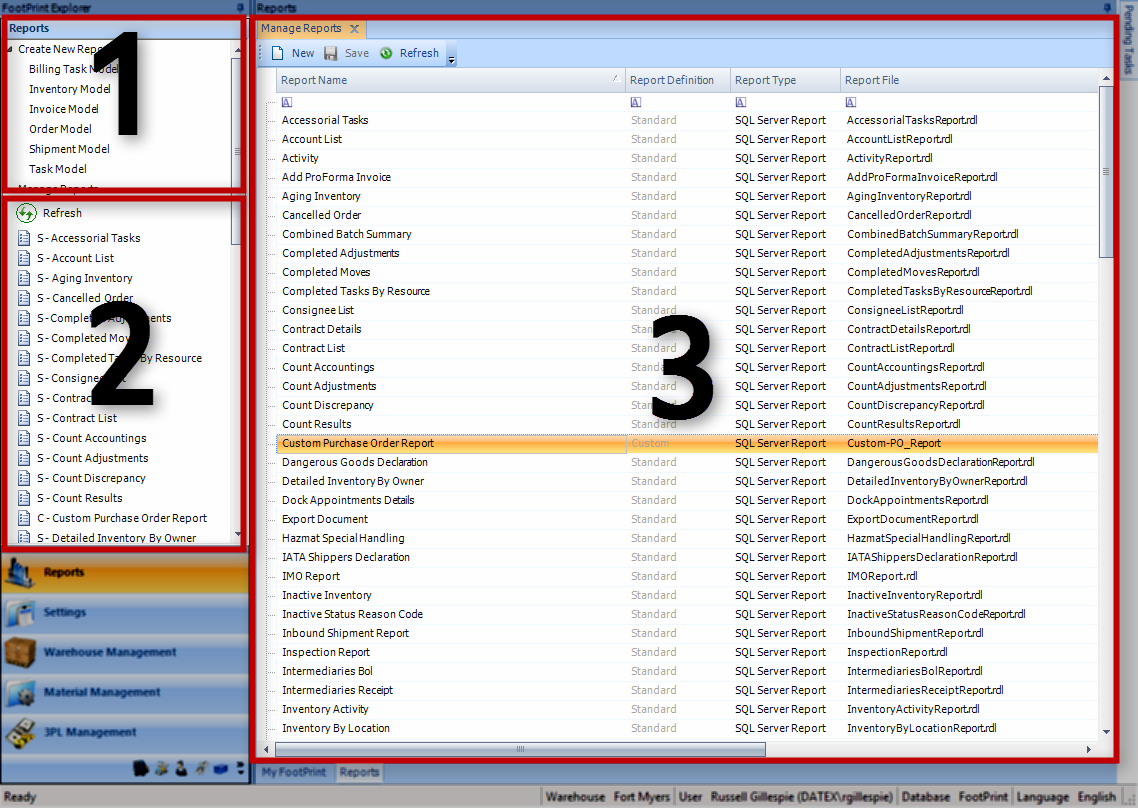
The Reports Module allows you to directly access all Reports you have set up in Footprint. The entire Module can be looked at in parts: the Custom Report Models, the Reports List, and the Reports Workspace.
1. Custom Report Models
This list of six separate Report Models allow you to create a new Report from scratch, opening the Report Builder.
2. Reports List
The Reports List displays all Reports in the system that have been made Visible in the Manage Reports section. This is where you open those Reports.
3. Reports Workspace
The Reports Workspace is where Reports populate when opened, and where you can Manage your Reports.
Custom Report Models
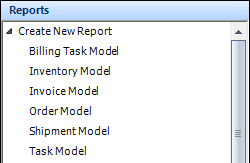
The Custom Report Models are displayed in a drop-down list at the top of the Footprint Explorer when the Reports Module is selected. By double-clicking one of the Reports Modules, the Report Builder opens in a new window on your computer, where you can create a new Report based on the model chosen. You have six options:
- Billing Task Model
- Inventory Model
- Invoice Model
- Order Model
- Shipment Model
- Task Model
Each Model limits you to information about the chosen type.
Custom Reports can be set up to display whatever information you'd like, and can be filtered to only display what you're looking for. This is all configured in the Report Builder.
Note
Custom Reports must be saved in the Custom Reports folder in your Reports Manager, otherwise they will not be accessible through Footprint. This should be under the following path: Home > Datex > Footprint > CustomReports
The Report Builder is a powerful tool, configured to make creating Custom Reports as simple as possible. There is a world of customizability within the Report Builder, and this guide will only touch on the basics. For more information, refer to the Report Builder's Help.
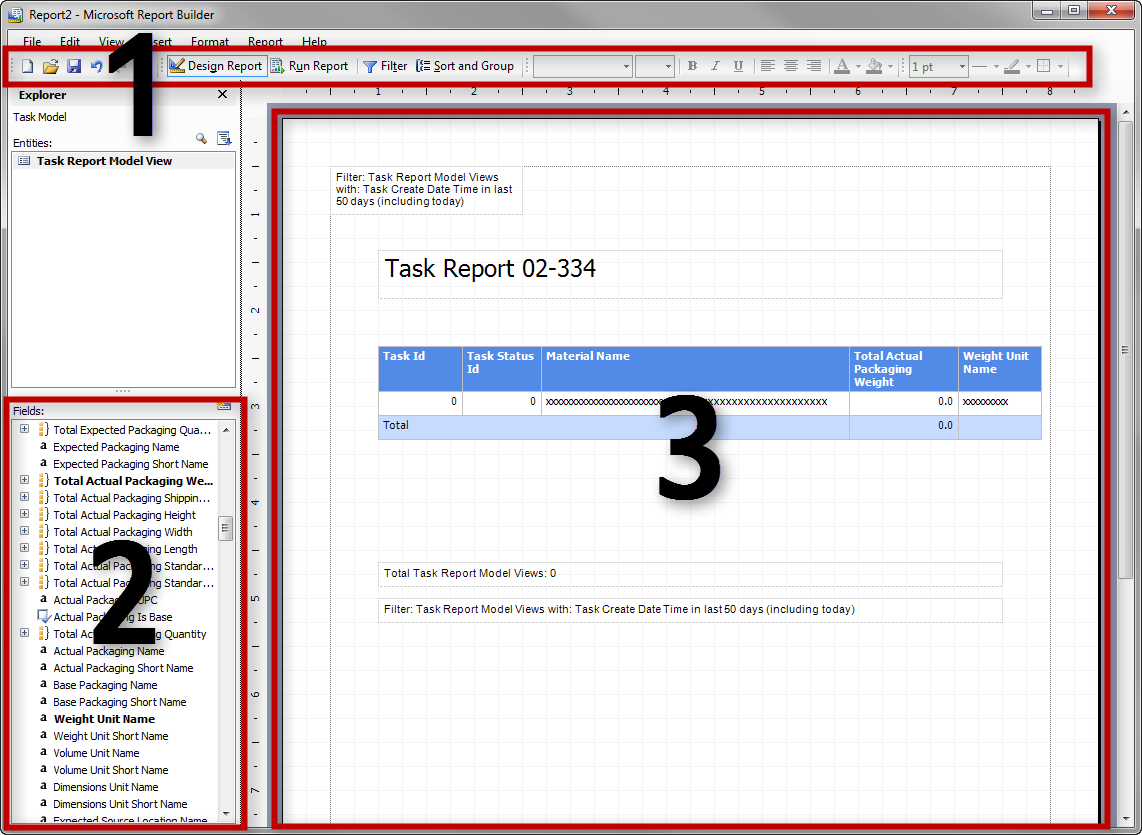
The Report Builder can be divided into three basic sections that are relevant to you: the Toolbar (1), the Fields List (2), and the Report Workspace (3).
Toolbar

The Toolbar contains many familiar icons, including a Save button. The Design Report and Run Report buttons switch between Designer view, where you are able to edit the Report, and the Report Preview, where you can run the Report to see how it will look.
The Filter button opens a pop-up window in which you can add Filters to the Report, so that it will only collect the data you want it to, or so that the User running the Report can select from drop-down lists what to display.
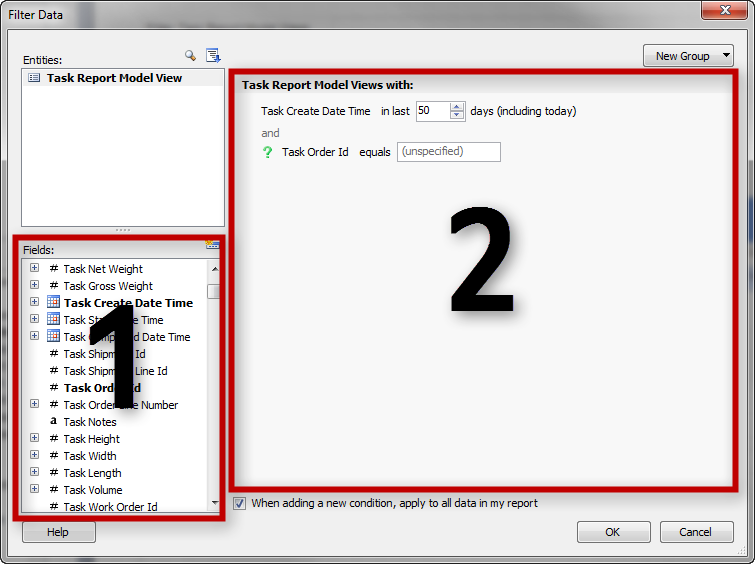
The Filters pop-up window is similar to the main Builder, in that you select from aFields List (1) on the lower left, and those chosen populate in theFilter Workspace (2). Double-clicking a field in the Fields List adds a Condition to the Filter Workspace, where you can make specific changes to how the Condition operates.
Each Condition of the Filter is composed of a sentence containing three parts: the Attribute (a noun - what is being filtered), the Connecting Term (a verb - how the Attribute is being filtered), and the Specification (an adjective - the terms of the Condition).
Example
The following Condition has its parts color coded - the Attribute is in red, the Connecting Term is in green, and the Specification is in blue.
Order Status equals Completed
Each part of the Condition sentence can be adjusted by clicking that particular part.
By clicking the Attribute, you can remove the Condition from the Filter. You can also choose to Prompt for this Condition, so that a User must enter input for this Filter (such as choosing an Order Status from a drop-down list, or entering an Order ID Number).
Clicking the Connecting Term allows you to alter how the Attribute is being filtered. You have options that include Equals for specific information, In a List to select the applicable Specifications from a list, From...To letting you set a date range, Relative Dates allowing you to set a date or date range relative to when the Report is being run, and more.
The Specification will change depending on the Connecting Term and Attribute you have set for the Condition, but this is typically where you would enter the specifics of how the Connecting Term filters the Attribute.
You can also set Conjunctions between Conditions to And or Or.
Fields
All possible Fields that can be added to the Report are displayed in this list along the left side of the Builder. Each Field can be double-clicked, or dragged and dropped onto the Workspace to be added to the Report.
Report Workspace
The Report Workspace is a visual representation of how the Report will look when it is run. Each box inside the Report can be moved by clicking and dragging their borders, and re-sized by clicking and dragging one of its corners. You can insert Text Boxes or Pictures from the Menu. Text boxes can be edited by clicking the text inside the box, and the Toolbar offers you a visual text editor similar to what you would find in most word processing editors.
Report Groups
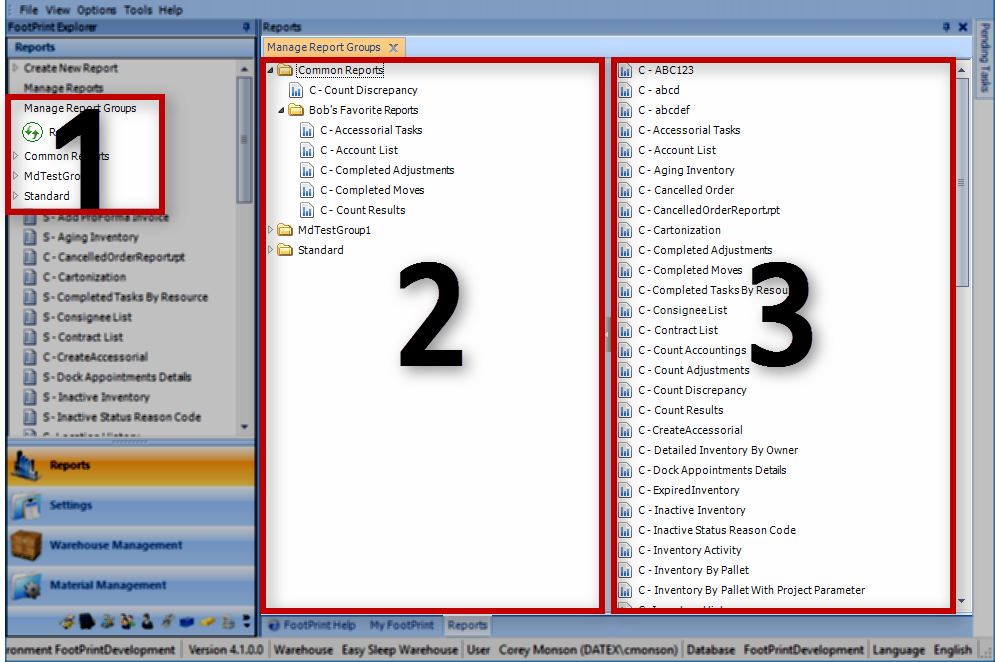
The Reports Groups Section allows you to organize your reports into custom folders called Report Groups. The section can be looked at in parts: the Report Group List within the Report List, the Report Group Management Pane, and the Available Reports Pane.
1. Report Group List
The option to open the Manage Report Groups Pane, as well as the Report Groups themselves, can be found at the top of the Reports List.
2. Report Group Management Pane
Here, you will find a list of all created Report Groups, and their individual hierarchy. It is in this pane that you can create, edit, or delete Report Groups.
3. Available Reports Pane
Unlike the Reports List, you cannot launch Reports directly from this pane. Instead, this is a where you will find the available reports to be added to the Report Groups that have been created in the Report Group Management Pane..
Reports List
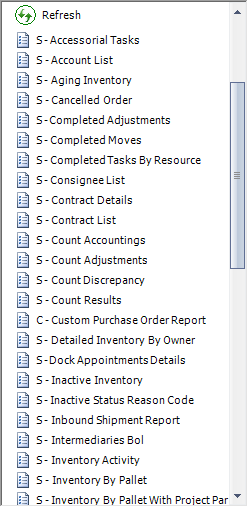
The Reports List displays all the Reports that are set to Visible in the Manage Reports section. This list is where you can run Reports, simply by double-clicking them. These Reports will open in the Report Workspace. Double-clicking the Refresh button loads the most current list of visible Reports.
Each Report in the list is preceded by one of three labels: S if the Report is a Standard Report (as shipped with Footprint), CS if the Report is a Customized Standard Report (see the Setting Up Reports tutorial), and C if it is a Custom Report made from scratch (see the Custom Report Models section).
Custom Reports can only be accessed through the Reports Module.
Standard Reports
See: Examples of Standard Reports
Here you can find a listing of all Standard Reports that come out of the box with Footprint.
List of Standard Reports
Report Name Explanation Accessorial Tasks List of all Accessorial Tasks for the chosen Owner and Status. Account List Listing of information about all Accounts in the system. Activity Listing of all Shipments in and out (and, optionally, Adjustments up and down) for the chosen date range, Owner, Project, or Material. Add ProForma Invoice Not yet developed. Aging Inventory Listing of the chosen Inventory's received and expiration dates, the number of days in the Warehouse, and so on. Cancelled Order Listing of all canceled Orders for the entered date range. Combined Batch Summary List of Manufacturing Orders grouped by chosen Statuses and Warehouses. Completed Adjustments Listing of all completed Inventory Adjustments for the chosen Owners and date range. Completed Moves Listing of all Moves (Inventory, LP, or both) completed over the chosen date range. Completed Tasks By Resource Listing of all Tasks completed over the specified date range by the entered employee. Consignee List A listing of all Consignee Accounts (active, inactive, or both). Contract Details A printable detailing of the chosen Contract's information, with each Contract Line listed. Contract List A listing of all Contracts in the system. Count Adjustments A listing of any Inventory Adjustments made as a result of Counts for the specified date range. Count Discrepancy A listing of any discrepancies recorded in Counts, filterable by Count or Location. Dangerous Goods Declaration Not yet developed. Detailed Inventory By Owner A listing of information on all inventory owned by a specified Owner. Dock Appointment Not yet developed. Dock Appointments Details Details of all Dock Appointments scheduled on the specified date. Export Document Not yet developed. HAZMAT Special Handling Not yet developed. IATA Shippers Declaration Not yet developed. IMO Report Not yet developed. Inactive Inventory A listing of all inactive inventory under the chosen Projects. Can search by Lot holds or LP (pallet) holds. Inactive Status Reason Code Not yet developed. Inbound Shipment Report Details information about the chosen Inbound Shipment, including Dock Appointment info and Shipment Lines. Inspection Report Not yet developed. Intermediaries BOL Not yet developed. Intermediaries Receipt Not yet developed. Inventory Activity Not yet developed. Inventory By Pallet A listing of all inventory, organized by LP (pallet). Inventory By Pallet With Project Parameter A listing of all inventory organized by LP (pallet), filterable by Project. Inventory History Not yet developed. Inventory Older Than Displays all inventory older than the specified number of days (can be grouped by LP or Lot). Inventory Summary Listing of all inventory for the chosen Owner(s), including details on Incoming, Allocated, Active, Inactive, and Availability. Inventory Totals Inventory totals for all Owners, including total units, total number of LPs, and total weight. Inventory Turnover Information on inventory totals, received and shipped out. Filterable by Project, Material, and date range. Invoice A printable Invoice detailing each Invoice Line. Invoice Register Listing of Invoices for a given date range. License Plate A printable License Plate Content Slip, detailing the Materials on the License Plate. Location History Current Inventory and a Task History for a specified Location. Locations Available Listing of Location availability, filterable by Warehouse. Lot Activity Details of Lot Activity for a chosen Lot, over the specified date range. Lot Tracking Detailed information including Activities for the specified Lot. Manufacturing Variance Summary Lists details about all Manufacturing Order that produced a different amount of Finished Goods than expected for the chosen Warehouse and Order Status. Master BOL Bill of Lading for the chosen Load Container. Material List List of all Materials and their Quantities for the chosen Owner. Material Transfer Lists the details of the chosen Material Transfer. Open Inbound Shipment Listing of all open Inbound Shipments. Open Outbound Shipment Listing of all open Outbound Shipments. Open Putaway Listing of all open Putaway Tasks. Open Shipments Listing of all open Shipments. Open Tasks Listing of all open Tasks. Order (Inbound Receiving Report) A Receiving Report for the chosen Inbound Order Outbound BOL A printable Bill of Lading for the chosen Outbound Shipment. Outbound Shipment Not yet developed. Owners List Listing of all Owners with contact information. Packaging Review Not yet developed. Packing Slip Packing Slip for specified Shipping Container, Shipping LP, or Shipment. Pick Slip Load Container Report Not yet developed. Packing Slip Verification Not yet developed. Pallet Activity Listing of all Pallet activity (number of Pallets in and out) for the specified Owner. Procurement Purchase Order Detail Not yet developed. Procurement Purchase Order Revision Review Not yet developed. Receipt Printable Warehouse Receipt including information about the Shipment and the Received items. Receiving Report by Order Receiving information for the selected Order and Shipment, detailing items Received. Return to Stock Count A listing of the Quantities of all Materials that were Returned to Stock for the chosen Manufacturing Order, Finished Good Line, and Location. Return to Stock Exceptions A listing of the variance of Materials that were Returned to Stock, compared to the expected, for the chosen Manufacturing Order, Finished Good Line, and Location. Return to Stock Recount A listing of the Recounts of all Materials that were Returned to Stock for the chosen Manufacturing Order, Finished Good Line, and Location. Revenue By Billing Code All revenue for the specified Owner(s) over a chosen date range, organized by Billing Code. Revenue By Month All revenue for the specified Owner(s) over a chosen date range, organized by month. Sales Invoice Invoice for the specified Sales Order Sales Order Details of the specified Sales Order, including Order Lines. Scale Ticket Not yet developed. Scale Ticket BOL Not yet developed. Serial Number Details Not yet developed. Shipping License Plates All Shipping License Plates for a specified Shipment. Shortage Inventory A listing of all inventory shortages, describing the Order and Shipment for which the shortage has occurred, the quantity specified in the Shipment, the amount in the Warehouse, and the difference (shortage) itself. Stress Inventory A listing of all inventory to expire in the specified number of days, filterable by Owner. Summary Inbound Shipments General summary of each Inbound Shipments for the specified Owner(s), completed over the chosen date range. Summary Outbound Shipments General summary of each Outbound Shipments for the specified Owner(s), completed over the chosen date range. Unloading Tally Details about the chosen Shipment including Carrier / Load information. Unloading Tallys by Order Details about the chosen Shipment and Order, including Carrier / Load information. Warehouse Receipt Invoice Printable Invoice for an Inbound Receipt. Warehouse Transfer Information on the chosen Warehouse Transfer. Work Order Information on the chosen Work Order.
Reports
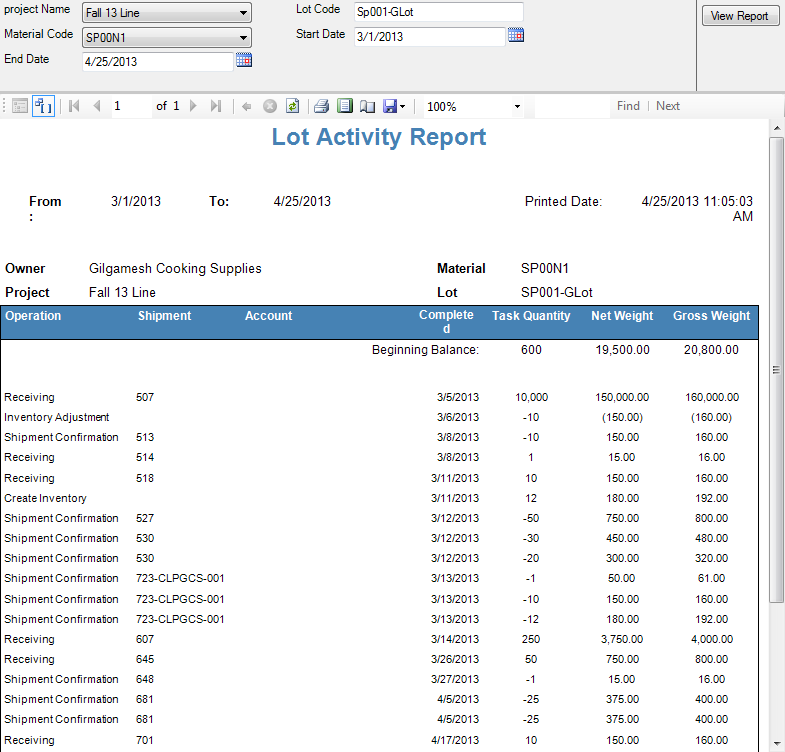
When a Report in the Reports List is double-clicked, it opens in the Reports Workspace. Each Report will be unique in appearance, depending on what information the Report was designed to display.
If the information does not automatically populate in the Report, you may be required to set Filter information. At the top of the Report is the Report Filter, from which you can set the Filter information. Again, this will be different depending on the Report you have open, but you will often find drop-down lists, date selectors, and open fields to enter information in. Once you have set the Filter, click the View Report button to display all relevant data in the Report.
Underneath the Report Filter you will find a Toolbar with buttons allowing you to scroll through pages in the Report, Refresh the displayed information, Print the Report, change the view of the Report, and Export the Report to XML, CSV, PDF, MHTML, Excel, Tiff file, or Word document.
Manage Reports
The Manage Reports section is where you can view basic Report information, set the Report's Visibility, Localize Reports, Customize Standard Reports, and add Custom Reports created in the Report Builder (see the Custom Report Models section).
The top of the Manage Reports section has three buttons: New to create add a new Report, Save to save the changes made to the Reports, and Refresh to load the most current Report information.
Note
Customized Standard Reports and Localized Standard Reports must exactly match the parameters of the original Standardized Report, or else the Report will not display. For example, a Standard Report using Shipment ID as a parameter will not be displayed if the Customized Standard Report does not have Shipment ID as a parameter.
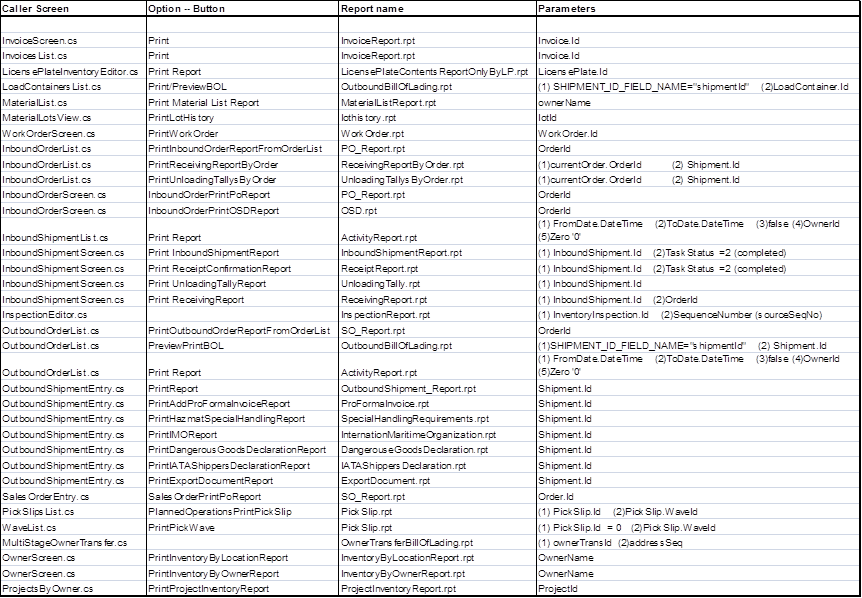
The following is a list of Report Parameters. Caller Screen is the screen in Footprint where the Report is called from, Option -- Button is the button that calls the Report, Report Name is the name of the Report, and the Parameters are all information required to display the Report.
Report Information

| LookUp Code: | The LookUp Code for the Report. This code can be utilized in workflows to call the report. |
| Report Name: | The Name of the Report, indicating what information the Report contains. |
| Report Definition: | The type of Report, either Standard (as shipped with Footprint), Customized Standard Report (see the Setting Up Reports tutorial),or Custom Report (see the Custom Report Models section). |
| Report Type: | The type of file the Report uses (either SQL or Crystal). All the Standard Reports included and Custom Reports you can make with Footprint are SQL Server Reports, but Crystal Reports are still supported if you use them. |
| Report File: | The file referenced for this Report. For all Standard Reports, this file selected on Installation and Upgrade, but you can, however, select a Customized Report from the drop-down list here and override the Report with a Customized Standard Report. New Custom Reports must have the file selected from this drop-down list as well. Only files stored in your Report Manager within the CustomReports folder are displayed here. |
| Localize Report: | The Localize Report button allows you to select a separate Report you've created from your CustomReports folder to add to the Report. This is intended for adding Reports in different Languages. |
| [Blank]: | This field displays different buttons depending on the Report. The Reset Standard Report button discards a Customized Standard Report and replaces it with the original Standard Report (the Customized Standard Report file remains in the Report Manager, and can be selected again from the Report File field). The Delete Report button appears for Custom Reports, allowing you to remove the Report from Footprint (the Custom Report file remains in the Report Manager). |
| Visible: | Putting a check in this box will allow the Report to be displayed and accessed in the Reports List. |
| System Report: | A check mark in this box indicates that the system uses this Report in a separate Module, where it can be accessed through Print buttons. |
Localized Reports are Reports you have customized and saved in your CustomReports folder that can be displayed in place of Standard Reports. Any Reports with a Localized Report added will display when opening a Report after selecting that Language from Footprint's Options Menu.

| Report Name: | The Name of the Report, indicating what information the Report contains. |
| Report Definition: | The type of Report (will be Custom for a Localized Report). |
| Report Type: | The type of file the Report uses (either SQL or Crystal). All the Standard Reports included and Custom Reports you can make with Footprint are SQL Server Reports, but Crystal Reports are still supported if you use them. |
| Report File: | The file referenced for this Report. Select a Customized Report from the drop-down list here to add a Localized (Customized) Standard Report. |
| Culture: | A drop-down list from which to select a Language for the Report. The Language selected from Footprint's Options Menu at the top of the screen determines which Report Language will be displayed when opening a Report. |
| [Blank]: | The Delete Report button allows you to remove the Localize Report from Footprint (the Custom Report file remains in the Report Manager). |
| Last Updated: |
| 06/06/2025 |
Copyright © 2025 Datex Corporation