Sections
Related Tutorials
- Mobile Inventory Moves
Overview
The Move Inventory section allows you to Move Inventory from one License Plate to a another using the Mobile Device.
From here you can...
Inventory Search
This screen is where you search License Plates for the Inventory you'd like to Move.
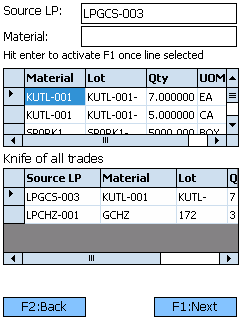
You must specify a License Plate in the Source LP field in order to begin searching for Inventory to Move. Once you've entered or scanned a License Plate, press the Tab key until the License Plate's Materials are populated in the upper list pane. You can also filter the displayed Inventory by Material.
Select the Material from the upper list pane and press the Enter key to go to Move Quantity screen. This must be done to select Inventory for the Move.
Once you have Material(s) selected to Move in the lower list pane, you can tap F1: Next or press the F1 key to open the Confirm Move screen.
Tapping F2: Back or pressing the F2 key takes you back to the main menu.
| Source LP: | The License Plate from which the Materials are being Moved. |
| Material: | The Material being Moved. |
| Lot: | The Lot of the Material being Moved. |
| Qty: | The number of Packages of the Material being Moved. |
| UOM: | The Packaging Type of the Material being Moved. |
Move Quantity
This screen is where you set the Amount of Packages of the selected Material to be Moved.
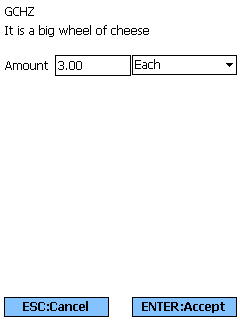
Enter the Amount of Packages of the Material to be Moved. You can select a Packaging Type from the drop-down list.
Tapping ENTER: Accept or pressing the Enter key selects the Amount specified to be Moved, and takes you back to the Inventory Search screen where you can select more Inventory, or Move the selected Inventory.
Tapping ESC: Cancel or pressing the Escape key discards the changes made here, and takes you back to the Inventory Search screen.
Confirm Move
You must specify one of the License Plates in the Source LP field to confirm that Move. Each Inventory Move must be completed one at a time.
Select the Material from the upper list pane and press the Enter key to go to Move Quantity screen. This must be done to select Inventory for the Move.
Tapping F1: Confirm or pressing the F1 key completes the Move in the system.
Tapping F2: Back or pressing the F2 key takes you back to the Inventory Search screen.
| LP: | The License Plate to which the Materials are being Moved. Scanning or entering a License Plate populates the Location. |
| Loc: | The Location to which the Materials will be Moved. By tapping F3:R or pressing the F3 key, the system can recommend a Location, displayed in the field below the Target Location. |
| [Not Labeled] | The number of Packages of the Material being Moved, next to which you can select the Packaging Type being Moved from a drop-down list. |
| Reason Code: | The Reason for the Move, if desired. |
Serial Information
If the Materials you are Moving are Serialized, you will need to select the Serial Numbers that are being Moved.
At the top of the screen is the SN field in which you scan or enter the Serial Number you have selected. Underneath this field is displayed the total Required amount of Serial Numbers, the amount of Serial Numbers already Selected, and the Total amount of Serial Number available to choose from.
The list pane on the upper half of the screen shows all available Serial Numbers. The list pane on the lower half of the screen shows all selected Serial Numbers.
Pressing the F4 key changes the goal of the screen, scanning the Serial Numbers you are not choosing rather than those you are. This is good for situations where you will be selecting more than half of the Serial Numbers that are available here.
Pressing the F5 key loads the most current information for the lists.
Pressing the F8 key automatically chooses the Required amount of Serial Numbers for you. Be sure to check this against the Serial Numbers of the Packages actually chosen in your Warehouse.
Pressing the F9 key deselects all Serial Numbers previously selected, clearing the bottom list pane.
Tapping F1: Accept or pressing the F1 key confirms all Serial Numbers selected.
Tapping F2: Cancel or pressing the F2 key takes you back to the previous screen.
| Serial #: | A unique Serial Number to identify the item. |
| Net: | The Net Weight of the item, without its Packaging. This box should be filled out for variable weight Materials. |
| Gross: | The Gross Weight of the item, including their Packaging. This box should be filled out for variable weight Materials. |
| Length: | The Length of the item. This box should be filled out for variable weight Materials. |
| Height: | The Height of the item. This box should be filled out for variable weight Materials. |
| Width: | The Width of the item. This box should be filled out for variable weight Materials. |
| Last Updated: |
| 06/06/2025 |
Copyright © 2026 Datex Corporation