Sections
Related Tutorials
Overview
Contracts are used in the 3PL module to determine what Owners are to be charged for your services. Every Event or Task you charge for will have a Contract Line set up for it in Footprint, and each Owner and Project will have a unique Contract created for it. You can also use Contracts along with your own accounting software. Contact Datex Corporation for more information about setting up your Billing system.
The Create Contract section is where you set up a Contract, adding Contract Lines and Activating it in the system.
From here you can...
Main Screen Layout
The Create Contract section is divided into two parts: the Basic Information Editor and the Contract Details Editor.
1. Basic Information Editor
This is where you set basic information about the Contract, including the Owner and Project it is associated with and its Start and End Dates, and where you Activate or Deactivate the Contract.
2. Contract Details Editor
Here you can view and make edits to the Contract Lines, and work with Attachments or User Defined Fields.
Basic Information Editor
The top of the screen contains several buttons: the New button creates a new Contract, the Edit button allows you to edit the open Contract, the Save button saves all changes made to the open Contract.
The Copy button allows you to duplicate the Contract you've created, with each Contract Line intact; all you need to do is select an Owner and a Project for the new Contract. This can be used with a Template Contract (a Contract you've created that is not Active for any Projects in the system), so that you won't have to re-create common Contract Lines every time you make a new Contract.
The Activate and Deactivate buttons allow you to perform those actions on the Contract. An Active Contract is used by the system to create Billing Records for the Owner and Project, and it will remain Active until the End date is reached, or it is manually Deactivated. Only one Contract can be Active per Project at any time. If no Contracts are Active for a Project, that Project will generate no Billing Records.
If you create a second contract for a Project, set its Effective Start Date to the day after the End Date of the first contract, and leave it Unactivated, the system will automatically switch over to the new Contract on its Start Date.
| Contract ID: | The system-generated ID number for the Contract (cannot be changed). |
| Name: | The Name for the Contract. |
| Owner: | A drop-down list from which you can select the Owner the Contract is for. |
| Project: | A drop-down list from which you can select the Project the Contract is for. |
| Account: | A drop-down list from which you can select an Account to associate with the Contract. |
| Effective Start/End: | The Start and End dates for the Contract. The Start date needs to be set to the date on which the Contract is being Activated in the system to function properly. |
| Status: | A system-generated field displaying the current Status of the Contract. |
| Currency: | A drop-down list to select the Currency the Contract is using. Currencies must be set up on installation of Footprint. |
| Tax Schedules: | A drop-down list to select the Tax Schedule the Contract is using. |
*Those in red are required fields.
An open field in which you can input whatever notes or extra information you would like. The notes are saved, but otherwise have no effect on anything in the system.
The Add Contract Line button opens a Billing Strategy Wizard, which will guide you through defining the particulars for a new Contract Line. For a detailed walk-through of the Wizard and each available Billing Strategy, see "Step 3. Add Contract Lines" of the Setting Up Contracts tutorial.
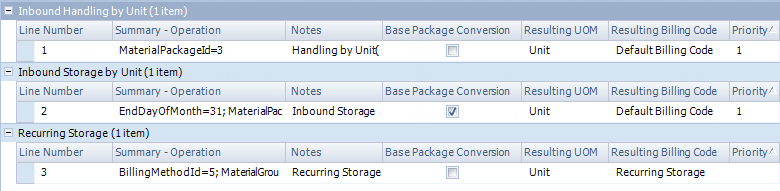
Contract Details Editor
Once you've created Contract Lines with the Add Contract Line button, each Line will be displayed in the Contract Items list. Lines are grouped by Billing Strategy.
Any fields you have set up for this section will appear here. For more information, see the User Defined Fields section.
| Last Updated: |
| 06/06/2025 |
Copyright © 2025 Datex Corporation